TM-9-2320-280-34 - Page 682 of 1258
TM 9-2320-280-34
14-14. HEATER/AIR-CONDITIONING CONTROL BOX REPLACEMENT (Cont'd)
NOTE
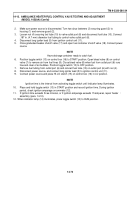
Prior to removal, tag control cables and corresponding duct door
arms for installation.
11.
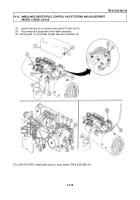
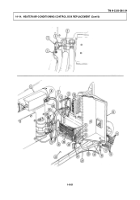
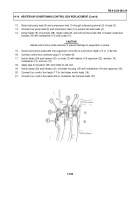
Remove two screws (6), lockwashers (5), and control cables (4) from air inlet duct (1).
Discard
lockwashers (5).
12.
Remove two pushnuts (2) and control cables (4) from duct door arms (3). Discard pushnuts (2).
13.
Remove two capscrews (14) and lockwashers (13) from plate (8) and evaporator duct (7). Discard
lockwashers (13).
14.
Remove two screws (10), lockwashers (9), and plate (8) from evaporator duct (7). Discard
lockwashers (9).
15.
Remove screw (12), lockwasher (15), and control cable (16) from evaporator duct (7). Discard
lockwasher (15).
16.
Remove pushnut (11) and control cable (16) from evaporator duct door (17) and disconnect control
cable (16) and pull through grommet (18). Discard pushnut (11).
17.
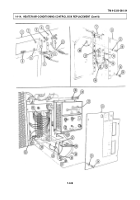
Remove four screws (24), lockwashers (25), and cover (23) from circuit box (33). Discard
lockwashers (25).
18.
Remove four screws (28) and control box leads (27) from terminal block (19).
19.
Remove nut and lockwasher assembly (31), clamp (30), and control box harness (29) from screw (32).
Discard nut and lockwasher assembly (31).
20.
Remove six screws (21), lockwashers (20), and control box (22) from body (26). Discard
lockwashers (20).
CAUTION
Use care when removing control box. Snagging or pulling may damage harness.
21.
Slowly remove control box (22), being careful not to snag any cables or leads.
b.
Installation
CAUTION
Use care when installing harness. Snagging or pulling may damage harness.
1.
Install control box (22) on body (26) while routing cables and leads to approximate mounting
positions.
2.
Install control box (22) on body (26) with six lockwashers (20) and screws (21).
3.
Install clamp (30) on control box harness (29) and circuit box screw (32) with nut and lockwasher
assembly (31).
4.
Install control box leads (27) on terminal block (19) with four screws (28).
5.
Install cover (23) on circuit box (33) with four lockwashers (25) and screws (24).
6.
Route control cable (16) through grommet (18) in evaporator duct (7).
7.
Install control cable (16) on evaporator duct door (17) with pushnut (11).
8.
Install control cable (16) on evaporator duct (7) with lockwasher (15) and screw (12).
9.
Install plate (8) on evaporator duct (7) with two lockwashers (9), screws (10), lockwashers (13), and
screws (14).
10.
Connect two control cables (4) on duct door arms (3) with two pushnuts (2).
11.
Install control cables (4) on air inlet duct (1) with two lockwashers (5) and screws (6).
14-82
Back to Top

