TM-9-2320-361-20 - Page 557 of 1207
TM 9-2320-361-20
7-16. FRONT SPRING MAINTENANCE (Contd)
b. Cleaning and Inspection
WARNING
Drycleaning solvent is flammable and will not be used near open
flame. Use only in well-ventilated places. Failure to do so may
result in injury to personnel.
1. Clean all parts with wire brush to remove dirt, rust, and corrosion.
2. Wash all parts in drycleaning solvent. Dry with clean rag.
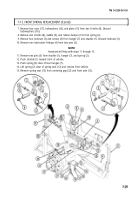
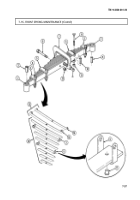
3. Inspect two bushings (7) and (11) for looseness and freeplay. Replace bushings (7) or (11) if damaged.
NOTE
Only the two leaves of the spring can be replaced. Damaged plates
require replacement of whole spring.
4. Inspect plates (15) through (22) for breaks or cracks. Replace entire spring (12) if any plates are
broken or cracked.
5. Inspect all other parts for cracks and breaks. Replace all other cracked or broken parts.
c. Assembly
1.
2.
3.
4.
5.
6.
7.
8.
9.
10.
7-38
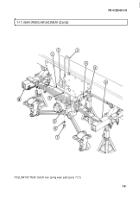
Position two long leaf clips (3) on plate (19) and install with two new rivets (24).
Position two short leaf clips (5) on plate (16) and install with two new rivets (23).
Apply graphite grease between plates and leaves while assembling.
Assemble leaf (13) in leaf (14) before placing over new center bolt (1).
Assemble plates (22) through (15) and leaves (13) and (14) on new center bolt (1) on a flat surface.
WARNING
When assembling plates and leaves with C-clamp, the plates and
leaves will be under tension. Use care not to disturb the assembly
until center bolt and nut are tightened. Failure to do so may result
in injury to personnel.
Install C-clamp (2) over leaves (13) and (14) and plates (15) through (22). Ensure there is clearance
for center bolt (1) and nut (10), and C-clamp (2) is squared and vertically centered across spring
plate assembly (12).
Tighten C-clamp (2) and install new nut (10) on new center bolt (1). Remove C-clamp (2) and peen
end of center bolt (1) to nut (10).
Install four spacers (8) in plate clips (5) and (3) with four new leaf screws (4) and new nuts (9).
Tighten nut (9) if leaf clip is loose. Ensure leaves and plates are parallel and not binding at sides of
leaf clips. Peen clip screws (4) over nuts (9).
Coat outside of bushings (11) and (7) with graphite grease.
Install bushings (7) and (11) in leaf eyes (6).
Back to Top

