TM-9-2320-387-24-2 - Page 313 of 1555
TM
9-2320-387-24-2
I----
1 l-50.
TURRET ARMOR AND TURRET BEARING HATCH LATCH REPLACEMENT
I
This task covers:
a. Removal
b. Installation
INITIAL SETUP:
Applicable Models
Ml114
Tools
General mechanic’s tool kit:
automotive (Appendix B, Item 1)
Materials/Parts
RTV sealant (Appendix C, Item 741
Manual References
TM 9-2320-387-24P
Maintenance and repair shop equipment:
Maintenance Level
automotive (Appendix B, Item 2)
Unit
NOTE
To
increase latch tension, 3/8 in. (9.5 mm) washers may be added
between bottom of turret armor and hatch latch.
I\
NOTE
l
Perform step 1 for turret armor-mounted hatch latch.
l
Perform steps 2 and 3 for turret bearing-mounted hatch latch.
1.
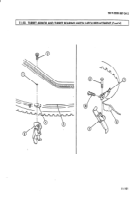
Remove capscrew (2), hatch latch (51, and spacer (4) from turret armor (3).
2.
Remove capscrew (6) and hatch latch (9) from turret hatch clamp bracket (7).
3.
Remove two capscrews (10) and turret hatch clamp bracket (7) from turret bearing (8).
b. Installation
NOTE
l
Apply sealant to capscrews prior to installation.
l
Perform steps 1 and 2 for turret armor-mounted hatch latch.
l
Perform steps 3 and 4 for turret bearing-mounted hatch latch.
1.
Apply RTV sealant around mount hole (1) prior to installing capscrew (2).
2.
Install spacer (4) and hatch latch (5) on turret armor (3) with capscrew (2). Tighten capscrew (2) to
37 lb-R (50 Nom).
3.
Install turret hatch clamp bracket (7) on turret bearing (8) with two capscrews (101. Tighten
capscrews (10) to 37 lb& (50 N-m).
4.
Install hatch latch (9) on turret hatch clamp bracket (7) with capscrew (6). Tighten capscrew (6) to
37 lb-f%
(50 Nom).
1
l-100
Back to Top


