TM-9-2350-311-10 - Page 620 of 775
TM 9-2350-311-10
5-15 UNPACKING AND INSPECTION — CONTINUED
a. Unpacking the M712 Projectile — Continued
Before removing the round from container, make a quick visual inspection of the projectile for
obvious damage or other condition that would prevent use. If projectile appears not usable,
replace lid and return to battalion ammunition section.
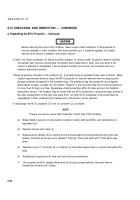
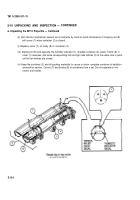
2 Open only those containers (2) whose humidity indicator (1) shows under 40 percent relative humidity
(40 percent spot must be colored blue, 30 percent spot maybe blue or pink), and only when a fire
mission is planned or anticipated. If the 40 percent humidity spot is pink, turn complete item in to
battalion ammunition section.
3 Keep all packing materials in the container (2). A protective bag is provided inside each container. When
mission requirements dictate a need, the M712 projectile (3) may be removed from the shipping and
storage container and placed in the protective bag. The protective bag will protect the round against
direct effects of water, sunlight, dirt, and debris. However, it will not protect the round from the elements
for more than 30 days at a time. Repackage unfired projectiles within 30 days and turn into battalion
ammunition section. The howitzer may be driven with two M712 projectiles, in protective bags, stowed in
the crew compartment on the right side (para 5-21). All other M712 projectiles to be moved must be
(repackaged in their containers and transported in ammunition carrier vehicles.
4 Unpackage the M712 projectile (3) from its container (2) as follows:
(a)
(b)
(c)
(d)
(e)
(f)
NOTE
There is one wire on center latch assembly of each side of the container.
Break metallic seal wire (if still present) located on center latch assembly, using screwdriver or
equivalent tool.
Depress manual relief valve (4).
Release all ten latches (5) by starting at one end and opening corresponding left and right side
latches. Pull latch all the way up to release T-bolts (6). Then push latch with T-bolts all the way
down.
Separate cover (7) from body (8) of container (2) and place upside down on ground, alongside the
body.
Partially pull torquing rod (9) from rear end of tension mechanism.
Use torquing rod (9) to release the tension by turning counterclockwise, then spin tension
mechanism by hand until it stops.
5-82
Back to Top

