TM-9-2815-220-24 - Page 1204 of 1563
TM 9-2815-220-24
PISTONS, RINGS, AND ASSOCIATED PARTS REPLACE/REPAIR
0142 00
INSPECTION (Continued)
NOTE
4
A
If dye inspection kit (item 35,
WP 0176) is available, use of that
inspection method to check for
cracks is preferred.
2. Inspect piston (4) for cracks, flaws or
distortion.
a. Use a magnifying glass and a strong
light.
Small cracks will show under the
light as irregular or dark streaks.
Replace
piston if any cracks are found.
b. Inspect piston (4) for damage or broken
ring lands.
Replace piston if damage or
broken lands are found.
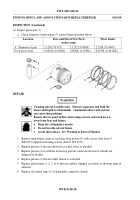
3. Measure the inside diameter of piston pin bore (A).
Replace pistons (4) that do not meet the
following limits.
Location
Sizes and Fits of New Parts - inches (mm)
Wear Limits
A
(Inside diameter of piston
pin bore)
2.1268 (54.0207)
2.1270 (54.0258)
2.1280 (54.0512)
B
4. Check the top (tapered) ring groove by one
of two methods.
a. Top groove (B) may be checked with
gauge (item 51, WP 0176).
(1) Insert gauge in top groove.
(2) If the shoulder of the gauge
touches the ring land, the piston
must be discarded.
b. Top groove may also be checked by
measuring over two 0.11547-inch
(2.932938-mm) diameter roll pins.
Replace pistons that do not meet the
following limits.
Location
Sizes and Fits of New Parts - inches (mm)
Wear Limits
STD
0.0100 oversize
0.0200 oversize
0.0300 oversize
0.0400 oversize
5.7140 (145.1356)
5.7240 (145.3896)
5.7340 (145.6436)
5.7440 (145.8976)
5.7540 (146.1516)
5.7240 (145.3896)
5.7340 (145.6436)
5.7440 (145.8976)
5.7540 (146.1516)
5.7640 (146.4056)
5.7040 (144.8816)
5.7140 (145.1356)
5.7240 (145.3896)
5.7340 (145.6436)
5.7440 (145.8976)
WP 0142 00-6
Back to Top


