TM-9-2815-220-24 - Page 1205 of 1563
TM 9-2815-220-24
PISTONS, RINGS, AND ASSOCIATED PARTS REPLACE/REPAIR
0142 00
WP 0142 00-7
Inside Width
A
B
C
INSPECTION (Continued)
NOTE
Piston ring locations are
numbered from the top down.
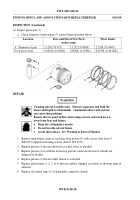
5. Check the second (A), third (B), and
fourth (C) ring grooves against limits
specified below.
a. Replace pistons that do not meet the
following limits.
Location
Sizes and Fits of New Parts
inches (mm)
Wear Limits
A
(Inside groove width)
0.0990 (2.5146)
0.1000 (2.54)
0.1035 (2.6289)
B
(Inside groove width)
0.0980 (2.4892)
0.0990 (2.5146)
0.1025 (2.6035)
C
(Inside groove width)
0.1880 (4.7752)
0.1890 (4.8006)
1.1910 (30.2514)
4
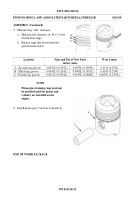
6. Measure piston (4) skirt.
a. Measure the piston diameter at the
bottom of the skirt 90 degrees to piston
pin (D).
b. Replace pistons that do not meet the
following limits.
D
Location and Size
Sizes and Fits of New Parts
inches (mm)
Wear Limits
D
(Standard)
D
(0.0100-inch oversize)
D
(0.0200-inch oversize)
D
(0.0300-inch oversize)
D
(0.0400-inch oversize)
5.7410 (145.8214)
5.7510 (146.0754)
5.7610 (146.3294)
5.7710 (146.5834)
5.7810 (146.8374)
5.7420 (145.8468)
5.7520 (146.1008)
5.7620 (146.3548)
5.7720 (146.6088)
5.7820 (146.8628)
5.7380 (145.7452)
5.7480 (145.9992)
5.7580 (146.2532)
5.7680 (146.5072)
5.7780 (146.7612)
Back to Top


