DMWR-9-2815-220 - Page 288 of 1422
5-36.
(Cont)
40,
'
·
i±² ³
:
-!
:
f'(.±²
.
,±;
²
±²³
²
.´µ¶¸¹º
»
¼
½
¾
f
·
¿ÀÁÂ
ÃÄÅ
ÆDZÈ?É;Ê
ËÌÍ•
•
³!´· µ¶¸-¹º»¼+
½1¾
´µ
¿ÀÁÂ
·
·
:³·´"µ
-¸¹º
»¼¹½
¾¿½À
ÁÂÃÄÅ
ÆÇÈÈÉ
ÊË-
Ì
ÍÎÏ ÐÑ
DMWR 9·2815-220
·
=
J
»A71¶¸
(2)
Valve stem±
L'r²³ecT va´ve sTeM foR cRacks usiNg
µA¶ method·
Do NoT ¸IsTake edge oF ¹Hº» plating on ste¸ FoR a cRacK.
¼lso ½nspect the
sTe¸s foR pittiNg,
scoR¾¿G, oR da¸aged tips.
ÀasURe va´ve steM oÁTside diaÂteR,
seaT aNgÃe, width oF locKÄÅÆg gRoove, ´e¿gthÇ a¿d gage dÈaÂTeR foR weaR .
Ò
e±
VaÉve SPRINÊs.
Ë
±
the in¿eR spRingÇ I¿ÌeÍÎediate spRIngÏ aNd oUteR
spRing FoR weaR, cRacksÐ
oR otheR evidence of faIlURe.
f·
Valve SPRi¿Ê ÑetaIÒeRsÓaNd ÔocKs±
ÕNspect valve spRi¿g Retai¿eRs a¿d locKs
foR weaR aNÖ cRacKs.
WoR1 ×ocks wIll have Ridges o¿ the top face.
g±
Valve ÑotoRsØ
ÙÚÛEe diFfeRenT valvÜ RotoRs have beeN used.
¼ll tÚRee aRe
sI¸IlaR ÝN appeaRa¿ce a¿d a´´ Þy be ßsedÇ In sets oR i¿TeRMixed, as ´o¿g as THey
pass INspectIo¿.
ËNspect va´ve RoToRs foR weaR oR cRacKs.
Ñep´ace woR¿ oR cRacked
RoToRs±
àesT all valve ÛOToRs, ßNdeR ´oad, To establish áhat RotaTio¿ occßRs wheN
The ´oad oN the âNIT Is cYc´ed thRoßgh The opeRatiNg Ra¿ge±
ã¿e valve RotoR wi´l
Rotate I¿ only one dIRecTäon aNd have a åRe Rapid Rate of RotatioN Tha¿ eITheR
of the otheR two RotoRs.
Ùhe otheæ two RotoRs ¸ay RoTate iN eitheR dIRectIoN,
howeveRÇ The Rate of Rotaçion wIl´ be ´ess tBaN the Rate of RotaTIoN foR The
RotoR That Rotates I¿ o¿e diRecTèo¿±
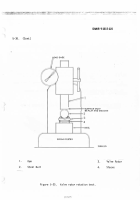
éhecK RotatioN of valve RotoRs as sHow¿ In
fIgUÛe 5-35 (5/ê6ë) aNd dEscRìbed below±
Ùhe key letteRs IN paRentheses beíow
ReFeR to figßRe 5-35 (5/îï2) u¿´ess otðeñise IndIcated.
(1)
ÔßbR½caTioN.
ãò´ RoToR by ióRsiNg eNTiRe RotoR iN co¿taiNeR of clea¿
eNgine oil ôõöÔ-Ô-2÷04).
øRaiN eXcessive oI´±
(2)
ùabRication.
ùúbRicate a shoRT s´eeve wiTh a¿ appRoXIMaTe oßTside
diaÂTeR The sa¸e as The ûßTeR (laRge) valve spRingÇ aNd aN I¿sIde d½aÂteR no
s¸a´leR tha¿ üýê/4 i¿ches
Ó
(3)
þRocßRe¸eNT.
þÿocâRe a haRdeNed steel bal´ wĀTh a ¸i¿i¸Uā dĂaÂteR of
3/ă Inch.
(ă)
Ë¿sTRucTIon PRoĄeduąesØ
þ´ace fabRicated sleeve (4) oN
Ć
latfoćÎ of
spRi¿g tesTeR.
þ´ace va´ve RotoR (3) (va´ve spRINg seat sIde downĈ oN sleeve±
þ´ace stee´ ball (2) on top of RoToR.
SßRface of RaM (ê), THat contacts ball,
ĉust be f´at a¿d s¸ooTh.
ĊaRK RefeReNce ċRks oN InneR and ouTeR sectIo¿s oF
RoToR (cha´kČ cRayo¿Č etc±).
;
(5)
ÑoTaTIon checkč
¼pp´y ´oad of ê5Ďďëë5 pouNds on RotoR±
¼lteRNate´y
iNcRease aNd ReĐease pRessuRe, in the ÷50-225 poU¿d Ra¿ge, whIle obseRving MaRks
to checK RoTaTioN±
SeveRal stRokes (25 đ
30) ¸ay be ReqâĒRed befoRe theRe is
ēecogNIzabĐe RotaTIo¿, as indicaTed by sepaRaTion of The ReFeReĔce MaRks.
Ñeject
ēoToRs That do not RoTate±
5ĕĖėü
Back to Top

