SMI-9-2320-387-14P-1 - Page 216 of 671
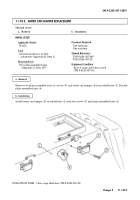
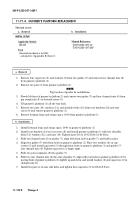
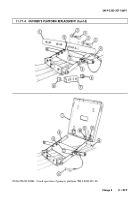
11-71.4. GUNNER’S PLATFORM REPLACEMENT
This task covers:
a. Removal
b. Installation
a. Removal
1.
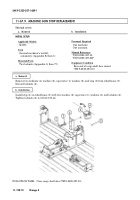
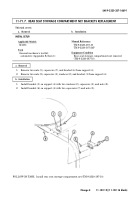
Remove four capscrews (3) and washers (2) from two guides (7) and remove four channel nuts (6)
from gunner’s platform (1).
2.
Remove two pins (4) from gunner’s platform (1).
NOTE
Tag location of guides for installation.
3.
Slowly lift front of gunner’s platform (1) and remove two guides (7) and four channel nuts (6) from
pin receptacles (8) on forward risers (5).
4.
Tilt gunner’s platform (1) all the way back.
5.
Remove two nuts (10), washers (11), and shoulder bolts (13) from rear brackets (12) and rear
risers (9) and remove gunner’s platform (1).
6.
Remove footman loops and straps (para. 10-9) from gunner’s platform (1).
INITIAL SETUP:
Applicable Models
M1151
Tools
General mechanic’s tool kit:
automotive (Appendix B, Item 1)
Manual References
TM 9-2320-387-10
TM 9-2320-387-24P
b. Installation
1.
Install footman loops and straps (para. 10-9) on gunner’s platform (1).
2.
Install rear brackets (12) on rear risers (9) and install gunner’s platform (1) with two shoulder
bolts (13), washers (11), and nuts (10). Tighten nuts (10) to 10-15 lb-ft (14-20 N
•
m).
3.
Slide two channel nuts (6) in guides (7), align with front hole in guide (7), and hold in place.
4.
Align two guides (7) with front holes in gunner’s platform (1). Place two washers (2) on cap-
screws (3) and install capscrews (3) through front holes in gunner’s platform (1) and guides (7)
into channel nuts (6). Tighten capscrews (3) finger tight.
5.
Slide two pin receptacles (8) into guides (7).
6.
Slide two rear channel nuts (6) into rear of guides (7), align with rear holes in gunner’s platform (1) by
moving front of gunner’s platform (1) slightly up and down, and install washers (2) and capscrews (3) in
channel nuts (6).
7.
Install two pins (4) on rear side holes, and tighten four capscrews (3) to 6 lb-ft (8 N
•
m).
SMI 9-2320-387-14&P-1
11-132.8
Change 4
Back to Top

