TB-9-2300-378-14 - Page 176 of 296
TB 9-2300-378-14
(d)
(e)
(f)
(g)
(h)
(i)
(j)
(k)
(l)
(m)
(n)
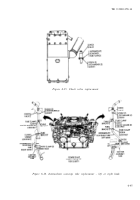
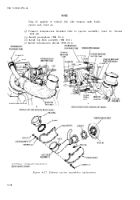
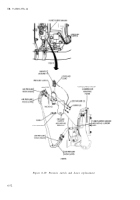
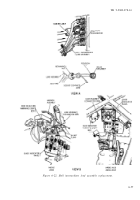
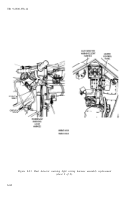
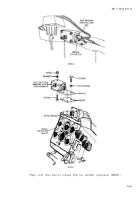
Disconnect wiring harness connector from right and left bank pressure
switches.
Remove screw and nut securing wiring harness and clamp to tube pad
retaining straps at two locations at rear of engine (view B). Take clamps off
wiring harness.
Remove screw and clamp securing wiring harness at two locations at rear of
engine. (view A). Take clamps off wiring harness.
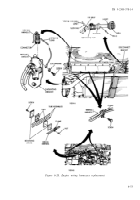
Disconnect starter cable at disconnect bracket (view A). Cut tie wraps.
Remove four screws and nuts securing starting cable connector to disconnect
bracket. Remove connector from bracket (view A).
Unscrew retaining nut from shell.
Slide retaining nut back along cable (view
A).
Slide sleeving back along wiring harness lead (view A).
Slide bushing back along cable (view A).
Remove pin from position “C” of insert (view A).
Pull lead from bushing and retaining nut (view A).
Remove wiring harness from engine.
(2) Installation
(a)
(b)
(c)
(d)
(e)
(f)
(g)
(h)
(i)
(j)
(k)
(l)
(m)
(n)
d.
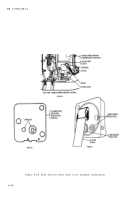
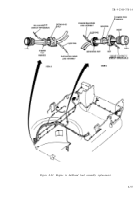
Engine to Bulkhead Lead Assembly Replacement (Fig. 6-21).
(1) Removal
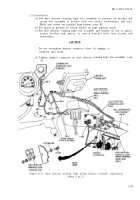
Lay wiring harness in position on engine between pressure switches and
starter cable disconnect bracket (views A and B).
Connect wiring harness long lead connector to right bank pressure switch and
wiring harness short lead connector to left bank pressure switch (view A).
Connect ground leads to right and left bank pressure switch mounting
brackets (view A). Secure with screws and new lockwashers.
At two locations at rear or engine (view B), assembly pads and retraining
straps around tube assemblies.
Pull slack out of wiring harness and secure
wiring harness to retaining straps with clamp, screw, and nut.
At two locations at rear of engine and at three locations along top left side
of engine, route wiring harness along with smoke generator wiring harness
and secure both harnesses with engine with clamp and screw (views A and B).
Temporarily place shell in position in bracket (view A).
Insert pin into position “C” of insert (view A).
Push insert into position in shell (view A).
Slide bushing against insert and slide sleeving against bushing (view A).
Install retaining nut onto shell and tighten (view A).
Place connector into disconnect bracket and secure with four screws and nuts
(view A).
Connect starter cable at disconnect bracket (view A). Install tie wraps ar
required.
Perform dust detector operational test (para. 6-17j).
Install engine shroud, transmission shroud, and top deck (TM 20-1).
CAUTION
Loosen retaining nut (view
B) of starter feed harness
connector before removing powerplant.
Failure to do so
may damage connector.
(a)
Disconnect three battery ground cable assemblies from battery terminals.
(b)
Remove powerplant (TM 20-1).
(c)
Remove right side bulkhead access cover (TM 20-1).
6-54
Back to Top

