TM-5-3895-372-20 - Page 238 of 694
TM 5-3895-372-20
ADMIX SYSTEMS
6-15. LIQUID ADMIX TANKS MAINTENANCE (HI-FLOW) (Continued).
LOCATION/ITEM
ACTION
REMARKS
A. REMOVAL (Continued).
4.
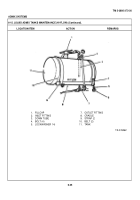
Two bolts (4), lock
Unscrew and remove. Move two
washers (5) and nuts (6).
straps (9) aside.
5.
Tank (11).
Remove.
6.
Two belts (10).
Remove.
B. REPAIR.
7.
Tank (11).
Weld any cracks using standard
See also TM 9237, Welding
practices for welding of galvanized
Theory and Application.
steel.
C. INSTALLATION.
NOTE
Use liquid teflon on all threaded joints at assembly.
8.
Two belts (10).
Put around tank (11).
Place belts so that they will lie
under straps (9) when tank is
mounted.
9.
Tank (11).
Place in cradle (8).
10.
Two straps (9).
Put around tank. Straps
should lie over belts (10).
11.
Two bolts (4), lock-
Put on and tighten.
washers (5), and
nuts (6).
12.
Outlet fitting (7).
Screw in and tighten.
13.
Down tube (3).
Place in tank (11).
Tighten inlet fitting (2).
14.
Fill cap (1).
Screw on and tighten.
NOTE
Install sight gage (para 6-9) before checking for leaks.
D. CHECKING FOR LEAKS.
15.
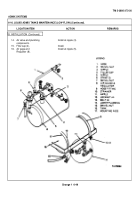
Tank (11).
a.
Fill.
b.
Pressurize (see TM 5-3895-
372-10).
c.
Check for air or liquid
leaks.
6-44
Back to Top


