TM-5-5420-202-10 - Page 102 of 535
0011
TM 5-5420-202-10
CLEANING DURING OPERATION
NOTE
During bad weather conditions such as blowing dust, rain, or snow, outside lens of viewer
may require cleaning to get a clear picture. Clean lens as instructed in the following steps.
1. Remove loose dust with lens dusting brush.
2. To remove stubborn dirt or smudges, use a white cotton rag. Gently wipe lens using a circular motion starting at
the center and working toward the edge. Dry lens with white cotton rag, using the same circular motions.
END OF TASK
REMOVAL AND STOWAGE
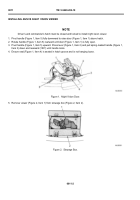
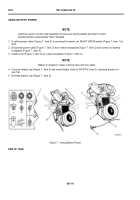
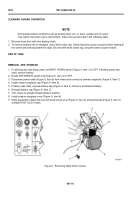
1. If vehicle power was being used, set NIGHT VISION switch (Figure 9, Item 1) to OFF. If battery power was
used, remove battery.
2. Rotate OFF-BRIGHT switch knob (Figure 9, Item 3) to OFF.
3. Disconnect power cable (Figure 9, Item 9) from viewer and connect to dummy receptacle (Figure 9, Item 7).
4. Install viewer receptacle cap (Figure 9, Item 8).
5. If battery was used, unscrew battery cap (Figure 9, Item 2). Remove and discard battery.
6. Reinstall battery cap (Figure 9, Item 2).
7. Turn viewer to straight forward (detent) position.
8. Install snap-on eyepiece cover (Figure 9, Item 6).
9. While supporting viewer with your left hand, press lever (Figure 9, Item 4) and pull handle (Figure 9, Item 5)
rearward (180°) until it locks.
Figure 9.
Removing Night Vision Viewer.
0011-8
Back to Top

