TM-9-2320-260-20 - Page 1227 of 1337
TM 9-2320-260-20
I
14-57. CONVOY WARNING LIGHT RESISTOR AND LEADS REPLACEMENT
THIS TASK COVERS:
a. Removal
b. Installation
INITIAL SETUP
APPLICABLE MODELS
REFERENCES (TM)
All
TM 9-2320-260-10
MATERIALS/PARTS
Two locknuts
TM 9-2320-260-20P
EQUIPMENT CONDITION
Three lockwashers
• Parking brake set (TM 9-2320-260-10).
Tiedown strap (Appendix C, Item 33)
• Hood raised and secured (TM 9-2320-260-10).
• Battery ground cable disconnected (para. 4-48).
a. Removal
NOTE
Tag all leads for installation.
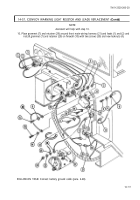
1. Disconnect leads
(1)
and (2) from warning light switch (3).
2. Remove tiedown strap (27) and leads (17) and (20) from front main wiring harness (21). Discard
tiedown strap (27).
NOTE
Assistant will help with step 3.
3. Remove two locknuts (4), screws (30), retainer (29), grommet (7), and two leads (1) and (2) horn
firewall (10). Discard locknuts (4).
4. Remove four screws (5), clips (6), and leads (2), (9), (16), and (28) from resistor (8).
5. Remove two screws (15), lockwashers (14), lead (28), and resistor (8) from firewall (10). Discard
lockwashers (14).
6. Disconnect lead (17) from headlight high beam selector switch (18).
7. Disconnect leads (11) and (13) from circuit breaker (12).
8. Remove nut (24), lockwasher (23), and wires (25) and (26) from starter solenoid (22). Discard
lockwasher (23).
9. Disconnect lead (19) from connector (20).
1.
2.
3.
4.
5.
6.
7.
8.
9.
Connect lead (19) to connector (20).
Install two wires (25) and (26) on starter solenoid (22) with new lockwasher (23) and nut (24).
Connect leads (11) and (13) to circuit breaker (12).
Connect lead (17) to headlight high beam selector switch (18).
Install resistor (8) and lead (28) on firewall (10) with two new lockwashers (14) and screws (15).
Install leads (2), (9), (16), and (28) on resistor (8) with four clips (6) and screws (5).
Insert leads (1) and (2) through hole in firewall (10).
Connect leads (1) and (2) to warning light switch (3).
Install leads (17) and (20) to front main wiring harness (21) with new tiedown strap (27).
14-110
Back to Top


