TM-9-2320-260-20 - Page 1217 of 1337
TM 9-2320-260-20
14-52. CONVOY WARNING LIGHT MOUNT (M820, M820A1 , M820A2)
REPLACEMENT
THIS TASK COVERS:
a. Removal
b. Installation
INITIAL SETUP
APPLICABLE MODELS
REFERENCES (TM)
M820, M820A1, M820A2
TM 9-2320-260-10
MATERIALS/PARTS
Eight lockwashers
Two tiedown straps (Appendix C, Item 33)
TM 9-2320-260-20P
EQUIPMENT CONDITION
•
Parking brake set (TM 9-2320-260-10).
• Convoy warning light removed (para. 14-58).
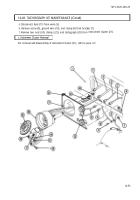
1. Remove tiedown strap (3) and harness (4) from support tube (10). Discard tiedown strap (3).
2. Remove wing screw (5) and support tube (10) from mounting bracket (9).
3. Remove mounting plate (2) from support tube (10).
4. Remove three screws (6), lockwashers (7), lifting bracket (8), and mounting bracket (9) from van
body (1). Discard lockwashers (7).
5.
Remove tiedown strap (14) and harness (4) from support tube (12). Discard tiedown strap (14).
6. Loosen wing screw (15) and remove support tube (12) from mounting bracket (21).
7. Remove mounting plate (13) from support tube (12).
8. Remove two screws (17) and lockwashers (18) and open heater access door (19). Discard
lockwashers (18).
9. Remove three nuts (11), lockwashers (23), screws (16), lifting bracket (22), mounting bracket (21),
and six washers (20) from van body (1). Discard lockwashers (23).
1.
2.
3.
4.
5.
6.
7.
8.
9.
Install six washers (20), mounting bracket (21), and lifting bracket (22) on van body (1) with three
screws (16), new lockwashers (23), and nuts (11).
Close heater access door (19) and secure with two new lockwashers (18) and screws (17).
Install mounting plate (13) and support tube (12).
Install support tube (12) on mounting bracket (21) with wing screw (15).
Install harness (4) on support tube (12) with new tiedown strap (14).
Install mounting bracket (9) and lifting bracket (8) on van body (1) with three new lockwashers (7)
and screws (6).
Install mounting plate (2) on support tube (10).
Install support tube (10) on mounting bracket (9) with wing screw (5).
Install harness (4) on support tube (10) with new tiedown strap (3).
14-100
Back to Top


