TM-9-2320-272-23-3 - Page 293 of 1469
INSTALLATION - Continued
NOTE
Perform Step (6) for M929/A1/A2 and M934/A1/A2 model vehicles.
6.
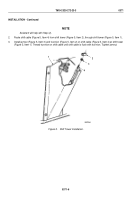
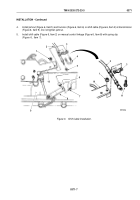
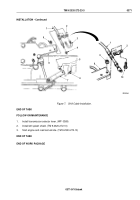
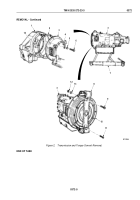
Install shift cable (Figure 7, Item 1) on transmission lock-in solenoid bracket (Figure 7, Item 8) with clamp
(Figure 7, Item 2), two screws (Figure 7, Item 10), and locknuts (Figure 7, Item 9), ensuring clamp seats in
groove of shift cable.
7.
Install shift cable (Figure 7, Item 1) on transmission lock-in solenoid bracket (Figure 7, Item 8) with clamp
(Figure 7, Item 2), U-bolt (Figure 7, Item 3), and two locknuts (Figure 7, Item 9), ensuring clamp seats in groove
of shift cable.
CAUTION
Ensure manual control linkage arm is in proper detent for each transmission selector position.
Failure to do so may cause damage to transmission.
8.
Remove spring clip (Figure 7, Item 6) and shift cable (Figure 7, Item 1) from manual control linkage
(Figure
7,
Item 7), if necessary.
9.
Place manual control linkage (Figure 7, Item 7) and transmission selector lever in first gear position.
10.
Align hole of manual control linkage (Figure 7, Item 7) with trunnion (Figure 7, Item 5). If trunnion does not
align, loosen jamnut (Figure 7, Item 4), and turn trunnion clockwise to shorten or counterclockwise to lengthen.
Tighten jamnut.
11.
Install shift cable (Figure 7, Item 1) on manual control linkage (Figure 7, Item 7) with spring clip
(Figure
7,
Item
6).
TM 9-2320-272-23-3
0371
0371-8
Back to Top

