TM-9-2320-272-23-4 - Page 903 of 1393
ASSEMBLY
NOTE
•
Coat all internal hoist winch parts with lubrication oil before installation.
•
Coat inside lips of seals with GAA grease before installation.
1.
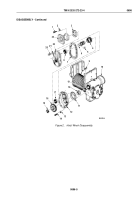
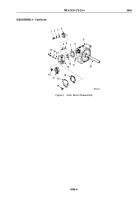
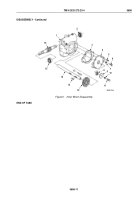
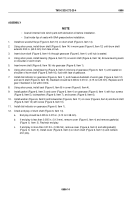
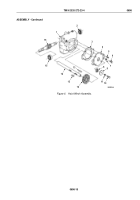
Install two woodruff keys (Figure 6, Item 13) on drum shaft (Figure 6, Item 14).
2.
Using arbor press, install drum shaft (Figure 6, Item 14) in worm gear (Figure 6, Item 12) until drum shaft
extends 2.50 in. (63.5 mm) from face of hub.
3.
Insert drum shaft (Figure 6, Item 14) through gearcase (Figure 6, Item 1) until hub is seated.
4.
Using arbor press, install bearing (Figure 6, Item 15) on worm shaft (Figure 6, Item 16). Ensure bearing seats
on shoulder of worm shaft.
5.
Insert worm shaft (Figure 6, Item 16) into gearcase (Figure 6, Item 1).
6.
Using arbor press, install bearing (Figure 6, Item 2) into bore of gearcase (Figure 6, Item 1) until seated on
shoulder of worm shaft (Figure 6, Item 16), flush with face of gearcase.
7.
Install dial indicator on gearcase (Figure 6, Item 1), and measure backlash of worm gear (Figure 6, Item 12)
and worm shaft (Figure 6, Item 16). Backlash should be 0.006 to 0.010 in. (0.15 to 0.25 mm). Replace worm
gear if backlash is not within limits.
8.
Using arbor press, install seal (Figure 6, Item 8) in cover (Figure 6, Item 4).
9.
Install gasket (Figure 6, Item 3) and cover (Figure 6, Item 4) on gearcase (Figure 6, Item 1) with four screws
(Figure 6, Item 5), lockwashers (Figure 6, Item 7), and screws (Figure 6, Item 6).
10.
Install washer (Figure 6, Item 9) and lockwasher (Figure 6, Item 11) on cover (Figure 6, Item 4) and drum shaft
(Figure 6, Item 14) with screw (Figure 6, Item 10).
11.
Install dial indicator on gearcase (Figure 6, Item 1).
12.
Check end play of drum shaft (Figure 6, Item 14).
a.
End play should be 0.005 to 0.015 in. (0.13 to 0.38 mm).
b.
If end play is less than 0.005 in. (0.13 mm), remove cover (Figure 6, Item 4) and remove gasket(s)
(Figure
6,
Item
3). Recheck end play.
c.
If end play is more than 0.015 in. (0.38 mm), remove cover (Figure 6, Item 4) and add gasket(s)
(Figure
6,
Item
3). Install cover (Figure 6, Item 4) on drum shaft (Figure 6, Item 14) and recheck
end
play.
TM 9-2320-272-23-4
0696
0696-14
Back to Top

