TM-9-2320-272-24-3 - Page 444 of 799
TM 9-2320-272-24-3
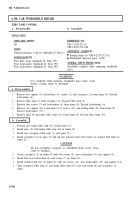
4-138. CAB WINDSHIELD REPAIR
THIS TASK COVERS:
a. Disassembly
b. Assembly
INITIAL SETUP:
APPLICABLE MODELS
REFERENCES (TM)
All
TM 9-2320-272-10
TOOLS
TM 9-2320-272-24P
General mechanic’s tool kit (Appendix E, Item 1)
EQUIPMENT CONDITION
MATERIALS/PARTS
Parking brake set (TM 9-2320-272-10).
Windshield removed (para. 3-278).
Four filler strips (Appendix D, Item 127)
Four lockwashers (Appendix D, Item 391)
Four lockwashers (Appendix D, Item 389)
GENERAL SAFETY INSTRUCTIONS
Eyeshields required when replacing windshield
glass.
WARNING
Use eyeshields when replacing windshield glass. Glass could
shatter, causing injury to personnel.
a. Disassembly
1.
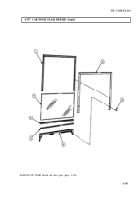
Remove two capnuts (3), lockwashers (4), screws (5), and crosspiece (2) from frame (8). Discard
lockwashers (4).
2.
Remove filler strip (1) from crosspiece (2). Discard filler strip (1).
3.
Remove four screws (7) and lockwashers (6) from frame (8). Discard lockwashers (6).
4.
Remove two capnuts (14), lockwashers (13), screws (11), and locking latch (12) from frame (8).
Discard lockwashers (13).
5.
Remove glass (9) and three filler strips (10) from frame (8). Discard filler strips (10).
b. Assembly
1.
Position new frame filler strip (10) around glass (9).
2.
Install glass (9) with frame filler strip (10) in frame (8).
3.
Install new crosspiece filler strip (1) over glass (9).
4.
Install crosspiece (2) on glass (9) and tap into position until screw holes are aligned with holes in
frame (8).
CAUTION
Do not overtighten crosspiece or windshield frame screws. Glass
could be damaged.
5.
Secure crosspiece (2) on frame (8) with two screws (5), new lockwashers (4), and capnuts (3).
6.
Install four new lockwashers (6) and screws (7) on frame (8).
7.
Install locking latch (12) on frame (8) with two screws (11), new lockwashers (13), and capnuts (14).
8.
Trim crosspiece filler strip (1) and frame filler strip (10) even with frame (8) and crosspiece (2)
edges.
4-708
Back to Top


