TM-9-2320-280-20-2 - Page 694 of 951
NOTE
The procedures for removing and installing the front and rear
upper control arms are basically the same. This procedure covers
the left front upper control arm.
1.
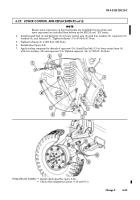
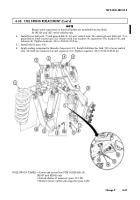
Remove capscrew (1), washer (2), and vent line bracket (3) from geared hub (4).
2.
Loosen clamp (6) and disconnect vent line (5) from fitting (7).
3.
Remove capscrew (23), clamp (21), and vent line (5) from upper control arm (16).
4.
Remove capscrew (24), washer (25), nut (27), clamp (26), and vent line (5) from upper control arm (16).
5.
Remove cotter pin (31), slotted nut (32), washer (30), and disconnect tie rod end (29) from geared
hub (4). Discard cotter pin (31).
6.
Remove access plug (8), washer (33), halfshaft retaining capscrew (9), and lockwasher (10) from
halfshaft (28) and geared hub (4). Discard lockwasher (10).
NOTE
Not direction of outer capscrews for installation.
7.
Remove four locknuts (15), washers (14), capscrews (11), and washers (14) from upper ball joint
(13), boot retainer (12), ball joint retainer (22), and upper control arm (16). Discard locknuts (15).
8.
Remove two locknuts (17), washers (18), capscrews (20), washers (18), and upper control arm (16)
from brackets (19). Discard locknuts (17).
NOTE
On front control arms, capscrew head is toward rear of vehicle.
On rear control arms, capscrew head is toward front of vehicle.
1.
Install upper control arm (16) to brackets (19) with two washers (18), capscrews (20), washers (18),
and locknuts (17).
NOTE
Ensure outer capscrews on front ball joints are installed from top
down and inner capscrews are installed from bottom up for
M1123 and “A2” vehicles only.
2.
Install upper ball joint (13) to upper control arm (16) ensuring upper ball joint (13) is placed above
upper control arm (16), and boot retainer (12) and ball joint retainer (22) are placed below upper
control arm (16). Secure with four washers (14), capscrews (11), washers (14), and locknuts (15).
Tighten locknuts (15) to 21 lb-ft (28 N
•
m).
3.
Tighten locknuts (17) to 260 lb-ft (353 N
•
m).
4.
Apply sealing compound to halfshaft retaining capscrew (9) and install halfshaft (28) to geared hub (4)
with lockwasher (10) and halfshaft retaining capscrew (9). Tighten capscrew (9) to 37 lb-ft (50 N
•
m).
b. Installation
a. Removal
6-28. UPPER CONTROL ARM REPLACEMENT
This task covers:
a. Removal
b. Installation
INITIAL SETUP
Tools
General mechanic’s tool kit:
automotive (Appendix B, Item 1)
Materials/Parts
Four locknuts (Appendix G, Item 79)
(Basic/A1 Series)
Four locknuts (Appendix G, Item 104)
(A2 Series)
Two locknuts (Appendix G, Item 89)
Cotter pin (Appendix G, Item 14)
Lockwasher (Appendix G, Item 146)
Sealing compound (Appendix C, Item 40)
Manual References
TM 9-2320-280-10
TM 9-2320-280-24P
Equipment Condition
• Wheel removed (para. 8-3).
• Hood raised and secured (TM 9-2320-280-
10), (front upper control arms only).
TM 9-2320-280-20-2
6-62
Change 3
Back to Top


