TM-9-2320-280-20-2 - Page 688 of 951
a. Removal
1.
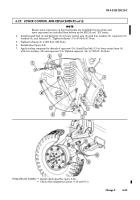
Remove locknut (1) and two washers (2) from bar link (3) and stabilizer bar (4). Discard locknut (1).
2.
Remove capscrew (5), two washers (6), and bar link (3) from lower control arm (7).
b. Installation
1.
Apply sealing compound to threads of capscrew (5). Install bar link (3) to lower control arm (7) with
two washers (6) and capscrew (5). Tighten capscrew (5) to 70 lb-ft (95 N
•
m).
2.
Install bar link (3) to stabilizer bar (4) with two washers (2) and locknut (1). Tighten locknut (1)
to 75 lb-ft (102 N
•
m).
6-24. STABILIZER BAR LINK REPLACEMENT
This task covers:
a. Removal
b. Installation
INITIAL SETUP:
Tools
General mechanic’s tool kit:
automotive (Appendix B, Item 1)
Materials/Parts
Locknut (Appendix G, Item 80)
Sealing compound (Appendix C, Item 46)
TM 9-2320-280-20-2
6-56
Change 3
Manual References
TM 9-2320-280-24P
Back to Top

