TM-9-2320-280-20-3 - Page 19 of 1168
TM 9-2320-280-20-3
10-4
Change 2
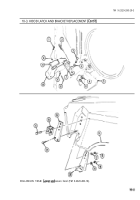
10-3. HOOD LATCH AND BRACKET REPLACEMENT
This task covers:
a. Removal
c. Assembly
b. Disassembly
d. Installation
Manual References
TM 9-2320-280-10
TM 9-2320-280-24P
Equipment Condition
_________________
Hood raised and secured (TM 9-2320-280-10).
a. Removal
1.
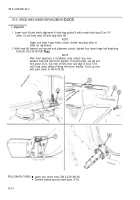
Remove two locknuts (6), washers (4), capscrews (3), and washers (4) from base (7) and body (5).
Discard locknuts (6).
2.
Remove spring pin (2) from latch (10) and base (7).
3.
Remove two locknuts (16), washers (17), capscrews (12), and latch bracket (13) from hood (15).
Discard locknuts (16).
4.
Remove three locknuts (18), washers (19), capscrews (21), latch stop bracket (20), and latch plate (14)
from hood (15). Discard locknuts (18).
NOTE
If only the rubber latch is to be replaced, the spring pin does not
have to be completely out of base.
b. Disassembly
Remove cotter pin (1), pin (8), two rollers (9), and hood latch (11) from latch (10). Discard cotter pin (1).
c. Assembly
Install hood latch (11) on latch (10) with two rollers (9), pin (8), and cotter pin (1).
d. Installation
1.
Install latch plate (14) and latch stop bracket (20) on hood (15) with three capscrews (21), washers
(19), and locknuts (18).
2.
Install latch bracket (13) on latch plate (14) with two capscrews (12), washers (17), and locknuts (16).
Tighten locknuts (16) and (18) to 10 lb-ft (14 N
•
m).
3.
Install latch (10) on base (7) with spring pin (2).
4.
Install base (7) on body (5) with two washers (4), capscrews (3), washers (4), and locknuts (6). Tighten
capscrews (3) to 6 lb-ft (8 N
•
m).
INITIAL SETUP:
Tools
General mechanic’s tool kit:
automotive (Appendix B, Item 1)
Materials/Parts
Seven locknuts (Appendix G, Item 70)
Cotter pin (Appendix G, Item 16)
Spring pin (Appendix G, Item 298)
Back to Top

