TM-9-2320-280-20-3 - Page 21 of 1168
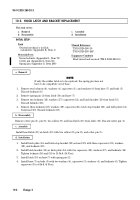
10-4. HOOD PROP ROD AND BRACKET MAINTENANCE
This task covers:
a. Removal
d
Assembly
b. Disassembly
e. Installation
c. Inspection
INITIAL SETUP:
Tools
General mechanic’s tool kit:
automotive (Appendix B, Item 1)
Materials/Parts
Four lockwashers (Appendix G, Item 135)
Locknut (Appendix G, Item 79)
Cotter pin
(Appendix G, Item 12)
Manual References
TM 9-2320-280-10
TM 9-2320-280-24P
Equipment Condition
Hood raised and secured (TM 9-2320-280-10).
General Safety Instructions
Hood must be supported during hood prop rod and
bracket replacement.
TM 9-2320-280-20-3
10-6
Change 2
WARNING
Hood must be supported during hood prop rod and bracket replace-
ment. Failure to support hood may cause injury to personnel or
damage to equipment.
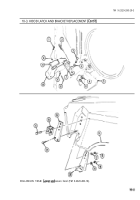
1.
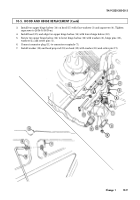
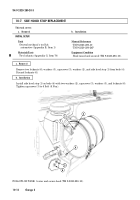
Remove cotter pin (4), washer (3), hood prop rod (2), and washer (3) from hood (1). Discard cotter
pin (4).
2.
Remove four screws (8), lockwashers (7), bracket (6), and hood prop rod (2) from airlift bracket (5).
Discard lockwashers (7).
1.
Remove hood prop rod (2) from eyebolt (15).
2.
Remove locknut (9), washer (10), bushing (16), spring (11), eyebolt (15), and washer (14) from
bracket (6). Discard locknut (9).
3.
Remove snapring (12) and bushing (13) from bracket (6).
Inspect
bushing (13), bushing (16), and spring (11) for cracks, wear, or distortion. Replace
bushing (13), (16), or spring (11) if cracked, worn, or distorted.
1.
Install bushing (13) on bracket (6) with snapring (12).
NOTE
Length of spring with bracket assembled is 2-1/4 in. (5.7 cm).
2.
Install washer (14), eyebolt (15), and spring (11) on bracket (6) with bushing (16), washer (10), and
locknut (9).
3.
Install
hood prop rod (2) into eyebolt (15).
d. Assembly
c. Inspection
b. Disassembly
a. Removal
Back to Top

