TM-9-2320-280-20-3 - Page 278 of 1168
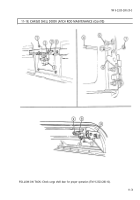
11-17. CARGO SHELL DOOR LATCH MAINTENANCE
This task covers:
a. Removal
c. Adjustment
b. Installation
a. Removal
1.
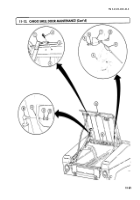
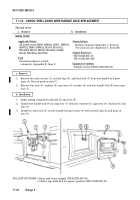
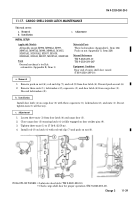
Remove push on nut (6), rod end clip (7), and rod (8) from door latch (4). Discard push on nut (6).
2.
Remove three nuts (1), lockwashers (2), capscrews (5), and door latch (4) from cargo door (3).
Discard lockwashers (2).
INITIAL SETUP:
Applicable Models
All models except M996, M996A1, M997,
M997A1, M997A2, M998, M998A1, M1035,
M1035A1, M1035A2, M1037, M1038,
M1038A1, M1042, M1097, M1097A1, M1097A2
Tools
General mechanic’s tool kit:
automotive (Appendix B, Item 1)
b. Installation
Install door latch (4) on cargo door (3) with three capscrews (5), lockwashers (2), and nuts (1). Do not
tighten nuts (1) all the way.
c. Adjustment
1.
Loosen three nuts (1) from door latch (4) and cargo door (3).
2.
Close cargo door (3) ensuring latch (4) is fully engaged on door striker pins (9).
3.
Tighten three nuts (1) to 17 lb-ft (23 N
•
m).
4.
Install rod (8) on latch (4) with rod end clip (7) and push on nut (6).
FOLLOW-ON TASKS: • Lubricate door latch (TM 9-2320-280-10).
• Check cargo shell door for proper operation (TM 9-2320-280-10).
TM 9-2320-280-20-3
Change 2
11-29
Materials/Parts
Three lockwashers (Appendix G, Item 134)
Push on nut (Appendix G, Item 228)
Manual References
TM 9-2320-280-10
TM 9-2320-280-24P
Equipment Condition
Rear end of cargo shell door raised
(TM 9-2320-280-10).
Back to Top

