TM-9-2320-361-34 - Page 427 of 764
TM 9-2320-361-34
15-32. ACCESS PLATE, ACCESS COVER, AND RETAINER ASSEMBLY REPLACEMENT
THIS TASK COVERS:
a. Access P1ate Removal
d. Access Cover Installation
b. Access Plate Installation
e.
Retainer Assembly Removal
c. Access Cover Removal
f. Retainer Assembly Installation
INITIAL SETUP
APPLICABLE MODELS
M185A3 and M109A3
TOOLS
General mechanic’s tool kit
(Appendix B, Item 1)
MATERIALS/PARTS
Eighteen screw-assembled lockwashers
(Appendix F, Item 167)
Six screw-assembled lockwashers
(Appendix F, Item 166)
Four screw-assembled Iockwashers
(Appendix F, Item 165)
REFERENCES (TM)
TM 9-2320-361-34P
NOTE
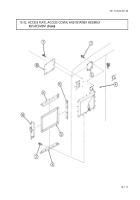
All access plates and covers are removed and installed basically the same.
I
a. Access Plate Removal
Remove four screw-assembled lockwashers (2) and access plate (3) from van wall (4). Discard screw-
assembled lockwashers (2).
b.
Access Plate Installation
Install access plate (3) on van wall (4) with four new screw-assembled lockwashers (2).
c. Access Cover Removal
I
Remove six screw-assembled lockwashers (1) and access cover (10) from van wall (4). Discard screw-
assembled lockwashers (l).
I
d. Access Cover Installation
Install access cover (10) on van wall (4) with six new screw-assembled lockwashers (l).
e. Retainer Assembly Removal
1. Remove ten screw-assembled lockwashers (7) and two retainers (6) from van wall (4). Discard
screw-assembled lockwashers (7).
2. Remove four screw-assembled lockwashers (7) and retainer (9) from van wall (4). Discard screw-
assembled lockwashers (7).
3. Remove four screw-assembled lockwashers (7), retainer with door catch (8), and weather seal (5)
from van wall (4). Discard screw-assembled lockwashers (7).
I
f. Retainer Assembly Installation
1. Install weather seal (5) and retainer with door catch (8) on van wall (4) with four new screw-
assembled lockwashers (7).
2. Install retainer (9) on van wall (4) with four new screw-assembled lockwashers (7).
3. Install two retainers (6) on van wall (4) with ten new screw-assembled lockwashers (7).
15-116
Back to Top

