TM-9-2320-387-24-2 - Page 822 of 1555
1.
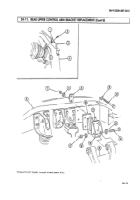
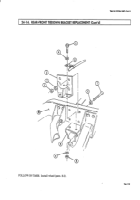
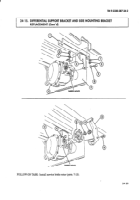
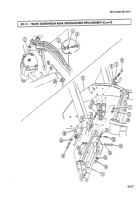
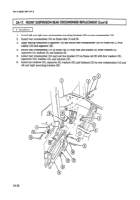
Align locating marks and install side mounting bracket (6) and mounting plate (4) on support
bracket (1) with two washers (3), capscrews (5), washers (3), and locknuts (2). Tighten capscrews (5)
to 90 lb-ft (122 N
•
m).
2.
Install support bracket (1) with side mounting bracket (6) attached on suspension crossmember (11)
with two washers (7), capscrews (13), washers (7), and locknuts (8).
CAUTION
Apply a liberal amount of thread sealing compound to the tapped
holes of differential. To allow adequate coating of threads, install
capscrews shortly after applying thread sealing compound.
Failure to do this could allow capscrews to loosen and cause
damage to differential.
3.
Apply sealing compound to tapped holes of differential (12). Install side mounting bracket (6) on
differential (12) with two washers (10) and short capscrews (9). Tighten capscrews (9) to
125-150 lb-ft (170-203 N
•
m) and locknuts (8) to 90 lb-ft (122 N
•
m).
4.
Apply sealing compound to tapped holes of differential (12) and install brake adapter (18) on
differential (12) with two capscrews (19). Tighten capscrews (19) to 125-150 lb-ft (170-203 N
•
m).
5.
Install output flange (15) on output shaft (14) with O-ring seal (16) and locknut (17). Tighten
locknut (17) to 170 lb-ft (231 N
•
m).
b. Installation
24-15. DIFFERENTIAL SUPPORT BRACKET AND SIDE MOUNTING BRACKET
REPLACEMENT (Cont’d)
TM 9-2320-387-24-2
24-22
Change 1
Back to Top

