TM-9-2330-335-14-P - Page 270 of 640
TM 9-2330-335-14&P
0055-2
0055
REMOVAL
00055
1.
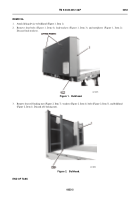
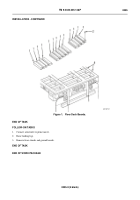
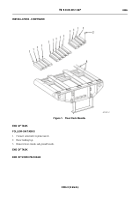
Measure board (Figure 1, Item 1) to be replaced.
2.
Remove screws (Figure 1, Item 2) as needed to free board (Figure 1, Item 1).
3.
Lift board (Figure 1, Item 1) away from frame.
4.
Repeat as needed for any other boards needing replacement.
5.
Grind flush all screws that have not been removed from crossmembers.
6.
Properly dispose of screws and boards.
END OF TASK
INSTALLATION
00055
1.
If paint has worn off crossmembers, re-coat with rust inhibitor and CARC paint.
NOTE
•
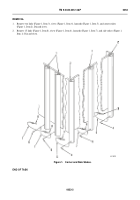
Lift and tilt boards so they properly fit in the ship-lapped grooves and rails as shown in Figure 1.
•
Because all decks are not the same, MINOR trimming of boards may be required. However, DO
NOT MODIFY a board to make it fit — follow Figure 1 and the ship-lap positioning.
•
If necessary, pre-mark (Figure 1, Item A) crossmembers so their location can be identified after
boards have been laid in place.
2.
Place boards (Figure 1, Item 1) into position.
NOTE
•
If a finger-joint in the board overlays a crossmember, screws may be installed though the finger-
joint. DO NOT try to cut the board so the finger-joint does not lay over a crossmember.
•
Steps 3 and 4 can be accomplished in one operation by using self-tapping deck screws.
3.
Drill boards and crossmembers at the same time with 9/32-in. holes to ensure matchup of holes. Countersink holes in
boards.
4.
Drive screws (Figure 1, Item 2) through boards into crossmembers using two screws per crossmember that board
overlays.
5.
Repeat steps 2 thru 4 for other boards that were removed.
6.
Treat new boards with boiled linseed oil or a UV wood protector.
Back to Top

