TM-9-2330-342-23-P - Page 758 of 1348
INSTALLATION
NOTE
•
If replacing valve with new valve, perform Steps (1) through (6).
•
Only remove two screws at a time.
•
Screws must be removed diagonally from each other.
1.
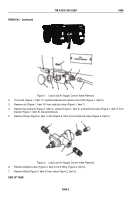
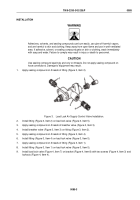
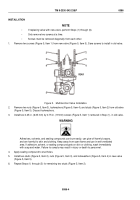
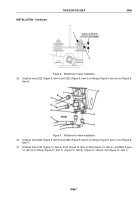
Remove two screws (Figure 5, Item 1) from new valve (Figure 5, Item 5). Save screws to install in old valve.
4
3
2
1
2
3
4
5
REAR
Figure 5.
Multifunction Valve Installation.
2.
Remove two nuts (Figure 5, Item 3), lockwashers (Figure 5, Item 4), and studs (Figure 5, Item 2) from old valve
(Figure 5, Item 5). Discard lockwashers.
3.
Install two 0.25 in. (6.35 mm) by 0.75 in. (19 mm) screws (Figure 5, Item 1) removed in Step (1), in old valve.
WARNING
Adhesives, solvents, and sealing compounds can burn easily, can give off harmful vapors,
and are harmful to skin and clothing. Keep away from open flame and use in well-ventilated
area. If adhesive, solvent, or sealing compound gets on skin or clothing, wash immediately
with soap and water. Failure to comply may result in injury or death to personnel.
4.
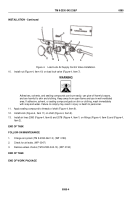
Apply sealing compound to stud holes.
5.
Install two studs (Figure 5, Item 2), nuts (Figure 5, Item 3), and lockwashers (Figure 5, Item 4) in new valve
(Figure 5, Item 5).
6.
Repeat Steps (1) through (5) for remaining two studs (Figure 5, Item 2).
TM 9-2330-342-23&P
0086
0086-4
Back to Top

