TM-9-2350-256-10 - Page 639 of 796
DISCONNECTING TRACK - Continued
10.
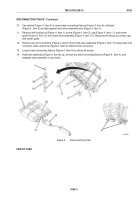
Use ratchet (Figure 4, Item 3) to close track connecting fixtures (Figure 4, Item 4) until jaws
(Figure 4, Item 5) are tight against track shoe assembly pins (Figure 4, Item 7).
11.
Remove self-locking nut (Figure 4, Item 1), screw (Figure 4, Item 2), cap (Figure 4, Item 11), and center
guide (Figure 4, Item 12) from track shoe assembly (Figure 4, Item 10). Discard self-locking nut, screw, cap,
and center guide.
12.
Remove two end connectors (Figure 4, Item 6) from track shoe assembly (Figure 4, Item 10) using track end
connector puller and pump (Figure 4, Item 9). Discard end connectors.
13.
Loosen track connecting fixtures (Figure 4, Item 4) to relieve all tension.
14.
Hold track assembly (Figure 4, Item 8) up, remove two track connecting fixtures (Figure 4, Item 4), and
separate track assembly. Lower track.
Figure 4.
Disconnecting Track.
END OF TASK
TM 9-2350-256-10
0106
0106-5
Back to Top


