TM-9-2350-311-20-1 - Page 623 of 1275
TM9-2350-311-20-1
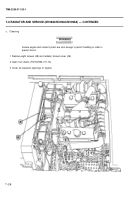
7-6 RADIATOR AND SHROUD (M109A2/M109A4/M109A5) — CONTINUED
b. Installation — Continued
11
12
13
14
15
16
17
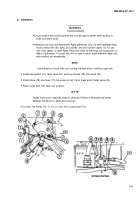
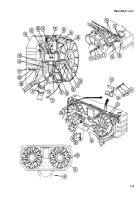
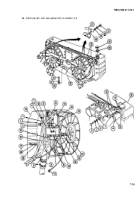
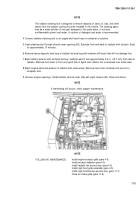
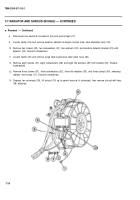
Install eight new Iockwashers (35), eight flat washers (34), and eight screws (33) on bracket (36).
Install bracket (30) with aeration detector (31) and relief valve (32) attached, two washers (29), two new
Iockwashers (28), and two screws (27).
Connect surge tank-to-pressure relief valve hose (26) and tighten fitting (25).
Install clamp (24), washer (23), screw (22), new Iockwasher (21), and nut (20).
Install aeration detector-to-engine coolant main tube assembly hose (19) and tighten clamp (18).
Connect two electrical connectors (16) and ground lead (17).
Install alternator (para 8-2).
Radiator weighs 88 lb (39.9 kg). Two personnel are required during removal and
installation.
Adhesives are toxic and flammable. Apply adhesives only in a well-ventilated area.
Avoid contact with skin, eyes, and clothes, and don’t breath vapors. Do not use
near heat, sparks, or open flame. Read and follow all warnings and instructions on
labels of adhesives. If contact with skin or eyes is made, wash area with water and
seek medical aid immediately.
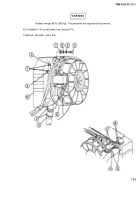
18 Apply adhesive (item 4, Appx D) on radiator inlet tube (14). Install radiator (10) and radiator inlet tube and
tighten two inlet hose clamps (13).
19 Apply adhesive (item 4, Appx D) to mating surface of radiator vent hoses (12). Install radiator vent hoses and
tighten two clamps (11).
20 Apply adhesive (item 4, Appx D) to mating surface of radiator outlet tube (9). Connect radiator outlet tube and
tighten two clamps (8).
21 Install two resilient mounts (7), two flat washers (6), two new Iockwashers (5), and two screws (4).
22 Apply adhesive (item 4, Appx D) to mating surfaces of surge tank-to-radiator hose (2) and radiator-to-aeration
detector hose (3). Install hoses and tighten two clamps (1).
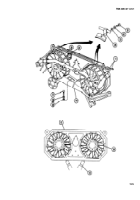
23 Install three clamps (40), three Iockwashers (39), three flat washers (38), and three screws (37), securing
radiator vent hoses (12).
24 Refill radiator with coolant (TM 9-2350-311-10).
25 Apply adhesive (item 3, Appx D) to new gasket (62) and install gasket to cap (61).
7-18
WARNING
Back to Top

