TM-9-2520-234-35 - Page 153 of 323
*C2
PAR
137-141
TORQUE CONVERTER HOUSING REBUIL D
CHAP
5,
SEC
X V
Section XV. TORQUE CONVERTER HOUSING—REBUIL D
137. DESCRIPTIO N
Refer to par. 9 for the description of the
torque converter housing.
138. DISASSEMBLY (fig. 374, fold-out 3)
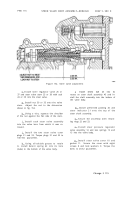
a . Using a 1-l/2-inch wrench, remove
output oil pump check valve plug, washer,
valve and spring (fig. 156).
b . Using a 9/16-inch wrench, remov e
five self-locking bolts retaining seal ring re-
tainer (fig. 156). Remove the retainer.
c . Do not remove the torque converter
ground sleeve unless replacement is neces-
sary (fig. 156). If necessary, press the sleeve
from the housing toward the front side.
d . Remove any plugs in the housing if
necessary to aid in the cleaning of oil passages.
Note. If necessary to remove inserts
or dowels, refer to par. 72 for inspec-
tion and repair recommendations.
139. CLEANIN G
Refer to par. 71 for cleaning recommen-
dations.
140. INSPECTION AND REPAIR
Refer to par. 72 for general inspection
and repair recommendations. Repair and re-
build points of measurement for fits, clear-
ances and wear limits are indicated by small,
lower
case
letters
in
fig.
374,
fold-out
3.
Refer to par. 237 for wear limits information.
Figure 156. Torque converter housing and related parts
141. ASSEMBLY (fig. 374, fold-out 3)
a . Install any plugs in housing which were
removed to aid in the cleaning of the torque
converter housing (fig. 156).
b . If the converter ground sleeve wa s
removed, install a new replacement ground
sleeve (fig. 156). Press sleeve into housing
until firmly seated, being sure that the bolt
holes in the housing and sleeve are properly
indexed.
c . Install the seal ring retainer and secure
with five 3/8-16 self-locking bolts (fig. 156).
Torque the bolts to 36-43 pound-feet.
d . Install output oil pump valve, spring,
washer and plug (fig. 156).
12 1
Back to Top


