TM-9-2815-205-24 - Page 827 of 856
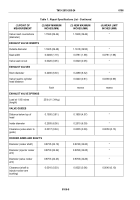
Table 1.
Repair Specifications List - Continued.
(1) POINT OF
MEASUREMENT
(2) NEW MINIMUM
INCHES (MM)
(3) NEW MAXMUM
INCHES (MM)
(4) WEAR LIMIT
INCHES (MM)
Diameter (at skirt–
turbocharged)
3.8699 (98.30)
3.8721 (98.35)
*
Diameter (at skirt–
nonturbocharged)
3.8679 (98.24)
3.8701 (98.30)
*
Clearance (skirt to liner–
turbocharged)
0.0027 (0.07)
0.0068 (0.17)
0.0100 (0.25)
Clearance (skirt to liner–
nonturbocharged)
0.0047 (0.12)
0.0088 (0.22)
0.0120 (0.30)
Out–of–round and taper
0.0005 (0.01)
*
Inside diameter (pin
bushing)
1.3775 (34.99)
1.3780 (35.00)
*
Compression Rings
Gap
0.0200 (0.51)
0.0460 (1.17)
0.0600 (1.52)
Clearance (Ring to Groove)
No. 1
0.0030 (0.08)
0.0060 (0.15)
0.0120 (0.30)
No. 2
0.0070 (0.18)
0.0100 (0.25)
0.0140 (0.36)
No. 3 and 4
(turbocharged)
0.0050 (0.13)
0.0080 (0.20)
0.0130 (0.33)
No. 3 and 4
(nonturbocharged)
0.0045 (0.11)
0.0070 (0.18)
0.0120 (0.30)
Oil Control Rings
Gap
0.0100 (0.25)
0.0250 (0.64)
0.0440 (1.12)
Clearance (ring to groove)
0.0015 (0.04)
0.0055 (0.14)
0.0080 (0.20)
Piston Pin
Diameter
1.3746 (34.91)
1.3750 (34.92)
Clearance (pin to piston
bushing)
0.0025 (0.06)
0.0034 (0.09)
0.0100 (0.25)
Clearance (pin to
connecting rod bushing)
0.0010 (0.03)
0.0019 (0.05)
0.0100 (0.25)
TM 9-2815-205-24
0106
0106-3
Back to Top


