TM-9-2815-225-34-P - Page 494 of 736
TM 9-2815-225-34&P
0053 00
0053 00-2
TORQUE LIMITS (Contd)
TORQUE TABLES
Table 1 lists dry torque limits. Dry torque limits are used on screws that do not have lubricants applied to
the threads. Table 2 lists wet torque limits. Wet torque limits are used on screws that have high-pressure
lubricants applied to the threads. For metric fasteners, refer to table 3 for torque limit requirements.
HOW TO USE TORQUE TABLES
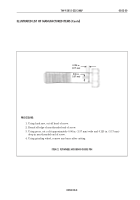
1.
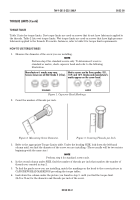
Measure the diameter of the screw you are installing.
NOTE
Perform step 2 for standard screws only. To determine if screw is
standard or metric, check capscrew head and refer to the following
illustration.
2.
Count the number of threads per inch.
3.
Refer to the appropriate Torque Limits table. Under the heading SIZE, look down the left-hand
column until you find the diameter of the screw you are installing. (There usually will be two entries
beginning with the same size.)
NOTE
Perform step 4 for standard screws only.
4.
In the second column under SIZE, find the number of threads per inch that matches the number of
threads you counted in step 2.
5.
To find the grade screw you are installing, match the markings on the head to the correct picture in
CAPSCREW HEAD MARKINGS preceding the torque tables.
6.
Look down the column under the picture you found in step 5. until you find the torque limit
(lb-ft or N
•
m) for the diameter and threads per inch of the screw.
Figure 2. Measuring Screw Diameter.
Figure 3. Counting Threads per Inch.
Manufacturer’s marks may vary.
Metric screws can be three grades: 8.8,
Screws shown are all SAE Grade 5 (3-line).
10.9, and 12.9. Grades and manufacturer’s
marks appear on the screw head.
8.8
10.9
12.9
STANDARD
METRIC
Figure 1. Capscrew Head Markings.
Back to Top


