SMI-9-2320-387-14P-1 - Page 306 of 671
This task covers:
a. Removal
b. Installation
INITIAL SETUP:
Applicable Models
M1152
Tools
General mechanic’s tool kit:
automotive (Appendix B, Item 1)
Materials/Parts
Adhesive (Appendix C, Item 8)
Two locknuts (Appendix G, Item 133.11)
Two lockwashers (Appendix G, Item 190.5)
Tiedown strap (Appendix G, Item 329.1)
Manual References
TM 9-2320-387-10
TM 9-2320-387-24P
Equipment Condition
Battery ground cable disconnected (para. 4-68).
a. Removal
b. Installation
1.
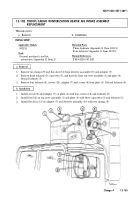
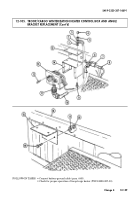
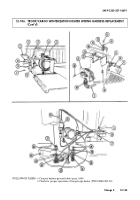
Disconnect control box lead 400 (7) from harness lead 1C (8).
2.
Remove tiedown strap (6) from ground lead 2C (3), ground lead (2), control box lead 400 (7), and
heater wiring harness (10). Discard tiedown strap (6).
3.
Disconnect cannon plug (11) from inner shell (13).
4.
Remove two screws (12) and control box inner shell (13) from outer shell (14),
5.
Remove two crown nuts (4), nuts (5), lockwashers (1), capscrews (9), ground lead 2C (3), ground
lead (2), and outer shell (14) from angle bracket (15). Discard lockwashers (1).
6.
Remove two locknuts (18), washers (17), capscrews (19), and angle bracket (15) from cargo
bulkhead (16). Discard locknuts (18).
1.
Install angle bracket (15) on cargo bulkhead (16) with two capscrews (19), washers (17), and
locknuts (18).
2.
Install outer shell (14), ground lead (2), and ground lead 2C (3) to angle bracket (15) with two
capscrews (9), lockwashers (1), and nuts (5).
3.
Apply adhesive to exposed threads of two capscrews (9) and install two crown nuts (4) on
capscrews (9).
4.
Install inner shell (13) on outer shell (14) with two screws (12).
5.
Connect cannon plug (11) to inner shell (13).
6.
Connect control box lead 400 (7) to harness lead 1C (8).
7.
Install tiedown strap (6) on ground lead 2C (3), ground lead (2), control box lead 400 (7), and heater
wiring harness (10).
SMI 9-2320-387-14&P-1
12-158
Change 4
12-105. TROOP/CARGO WINTERIZATION HEATER CONTROL BOX AND ANGLE
BRACKET REPLACEMENT
Back to Top

