SMI-9-2320-387-14P-1 - Page 348 of 671
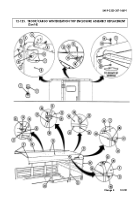
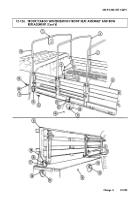
12-125. TROOP/CARGO WINTERIZATION TOP ENCLOSURE ASSEMBLY REPLACEMENT
This task covers:
a. Removal
b.
Installation
Personnel Required
One mechanic
One assistant
Manual References
TM 9-2320-387-24P
Equipment Condition
Top cover assembly removed (para. 12-124).
a. Removal
1.
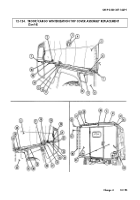
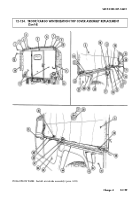
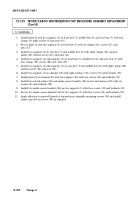
Remove safety caps (2) as required from top enclosure assembly mounting screws (1).
2.
Remove six locknuts (9) and screws (5), and two outside plates (4) from inside corner brackets (6),
and end enclosures (8). Discard locknuts (9).
NOTE
For installation, note size and location of inside corner bracket
mounting screws.
3.
Remove four locknuts (7) and screws (11) from two inside corner brackets (6) and supports (3).
Discard locknuts (7).
4.
Remove four locknuts (10) and screws (12) from two inside corner brackets (6) and supports (3).
Discard locknuts (10).
5.
Remove two locknuts (17) and screws (15) from plate (14), channel (13), and two supports (16).
Discard locknuts (17).
6.
Remove eight locknuts (20), screws (19), and washers (18) from two supports (3) and channel (13).
Discard locknuts (20).
7.
Remove sixteen nuts (38), screws (40), and eight clamps (39) from two supports (21), supports (3),
rear bow (24), and middle bow (23).
8.
Remove four nuts (35), screws (37), clamps (36), two supports (21), and supports (3) from front
bow (22).
9.
Remove sixteen nuts (31), screws (28), eight support plates (29), and clamps (30) from two
supports (16), rear bow (24), and middle bow (23).
10.
Remove six nuts (34), screws (32), and clamps (33) from two supports (16), plate (14), and
front bow (22).
11.
Remove eight nuts (27), screws (25), four clamps (26), two supports (16), and plate (14) from rear
bow (24) and middle bow (23).
SMI 9-2320-387-14&P-1
12-200
Change 4
INITIAL SETUP:
Applicable Models
M1152
Tools
General mechanic’s tool kit:
automotive (Appendix B, Item 1)
Materials/Parts
Adhesive (Appendix C, Item 8)
Eighteen locknuts (Appendix G, Item 101.6)
Six locknuts (Appendix G, Item 133.12)
Back to Top

