TB-9-2510-251-24 - Page 66 of 212
TB 9-2510-251-24
1-56
3)
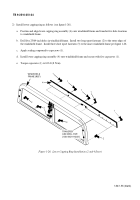
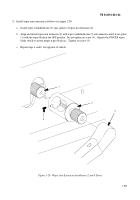
Install windshield armor (see figure 1-27).
a.
Apply Sealing compound to capscrews (2).
CAUTION
INTERIOR SURFACE OF WINDSHIELD GLASS IS
EASILY DAMAGED AND MUST BE PROTECTED
DURING DRILLING OPERATIONS.
b.
Position and align upper capping ring assembly (1) onto windshield frame pushed up until contacting
wiper pivot nuts, and transfer five hole locations to windshield frame.
Drill five each 25/64-inch holes in
windshield frame.
Install five short upset fasteners (4) in windshield frame.
c.
Install upper capping ring assembly (1) onto windshield frame and secure with five capscrews (2).
Do not
torque capscrews (2) at this time.
d.
Position and align center capping ring assembly (5) onto windshield frame and transfer three hole
locations to windshield frame.
Remove center capping ring assembly (5).
e.
Drill three each 25/64-inch holes in windshield frame. Install three short upset fasteners (4) in windshield
frame.
f.
Install center capping ring assembly (5) and secure with three capscrews (2).
Do not torque capscrews (2)
at this time.
g.
Position and align left capping ring assembly (3) onto windshield frame and transfer four hole locations to
windshield frame. Verify visually potential edge breakouts prior to drilling. Drill four each 25/64-inch
holes in windshield frame.
Install four short upset fasteners (4) in windshield frame.
h.
Install left capping ring assembly (3) onto windshield frame and secure with four capscrews (2).
Do not
torque capscrews (2) at this time.
i.
Position and align right capping ring assembly (3) onto windshield frame and transfer four hole locations
to windshield frame. Verify visually potential edge breakouts prior to drilling. Drill four each 25/64-inch
holes in windshield frame.
Install four short upset fasteners (4) in windshield frame.
j.
Install right capping ring assembly (3) onto windshield frame and secure with four capscrews (2).
Do not
torque capscrews (2) at this time.
k.
Torque capscrews (2) to 6 lb ft (8 N
•
m).
Back to Top


