TM-9-1290-365-24-P - Page 238 of 334
ARMY TM 9-1290-365-24&P
D.6.8 Repair.
Repair defective parts that were noticed during preshop analysis (para. D.3) and visual
inspection (para. D.6.7).
D.6.9 Painting.
No painting required on power supply module.
D.6.1O Power Supply Module Reassembly.
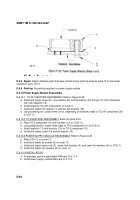
D.6.10.1 TO-247 HEATSINK REASSEMBLY Refer to Figure D-25.
a. Install and fasten screw (21), lock washer (22) and flat washer (23) through TO-247 component
(20) onto heatsink (16).
b. Install heatsink (16) with components on CCA (1).
c. Install and fasten two screws (17) and two flat washers (18).
d. Using soldering iron, solder three (or six, depending on heatsink) leads of TO-247 component (20)
to CCA (1).
D.6.10.2 TO-5 HEATSINK REASSEMBLY Refer to Figure D-25.
a. Place TO-5 component (10) and insulator (13) on OCA (1).
b. Using soldering iron, solder three leads of TO-5 component (10) to OCA (1).
c. Install heatsink (11) and insulator (12) on TO-5 component (10).
d. Install and fasten screw (14) and flat washer (15).
D.6.10.3 POWER SUPPLY MODULE REASSEMBLY Refer to Figure D-25.
a. Place CCA (1) on cover (7).
b. Install and fasten six screws (6) on cover (7).
c. Install and fasten seven nuts (3), seven lock washers (4), and seven flat washers (5) on CCA (1).
d. Install and fasten four spacers (9) on cover (7).
D.6.1 0.4 INSTALLATION.
a. If necessary, perform adjustment lAW para. D.6.11.4.
b. Install power supply module lAW para. D.4.11.3.
D-68
Back to Top


