TM-9-2320-260-34-2 - Page 705 of 863
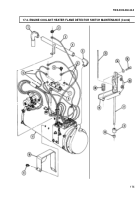
17-3. ENGINE COOLANT HEATER FLAME DETECTOR SWITCH MAINTENANCE
THIS TASK COVERS:
a. Removal
d. Assembly
b. Disassembly
e. Installation
c. Inspection
INITIAL SETUP
APPLICABLE MODELS
All
TEST EQUIPMENT
Multimeter (Appendix B, Item 115)
TOOLS
General mechanic’s tool kit
(Appendix B, Item 1)
Tool kit, electrical (Appendix B, Item 106)
MATERIALS/PARTS
Five screw-assembled lockwashers
(Appendix D, Item 384)
MATERIALS/PARTS (Contd)
Four screw-assembled Iockwashers
(Appendix D, Item 386)
Sleeve (Appendix D, Item 509)
Insulation varnish (Appendix C, Item 17)
REFERENCES (TM)
TM 9-2320-260-20
TM 9-2320-260-34P-2
EQUIPMENT CONDITION
Engine coolant heater removed (TM 9-2320-260-20).
NOTE
Tag wires for installation.
a .Removal
1. Remove four screw-assembled lockwashers (9) and guard (10) from heater housing (11). Discard
screw-assembled lockwashers (9).
2. Remove nut-assembled lockwasher (2), ground lead (3), air tube (4), and elbows (1) and (5) from
heater housing (11).
3. Remove five screw-assembled lockwashers (12) and six leads (6) from flame detector switch (7).
Discard screw-assembled lockwashers (12).
4. Loosen nut (8) and remove flame detector switch (7) from heater housing (11).
b. Disassembly
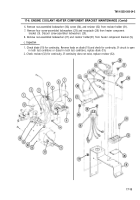
1. Remove adjusting screw (15), washer (14), and spring (20) from microswitch (16) and mount (19).
CAUTION
Ceramic rod is very brittle and is easily broken; handle carefully.
2. Tilt microswitch (16) back on mount (19), invert, and remove ceramic rod (13) from probe (17).
3. Remove sleeve (18) and nut (8) from probe (17). Discard sleeve (18).
c. Inspection
1. Inspect probe (17) of flange detector switch (7) for bends and corrosion. Remove corrosion from
probe (17). Replace flame detector switch (7) if bent.
2. Inspect ceramic rod (13) for chips, cracks, and breaks. Replace ceramic rod (13) if chipped, cracked,
or broken.
17-4
TM 9-2320-260-34-2
Back to Top


