TM-9-2320-272-23-2 - Page 997 of 1417
INSPECTION
1.
Inspect fan shrouds for cracks and missing pieces.
2.
Lay fan on flat surface. Ensure all blades of fan contact the flat surface the same way.
3.
Inspect fan for cracks, broken pieces, and loose anchorage and studs for cracks or stripped threads.
4.
Inspect all other parts (Volume 5, WP
0819).
5.
Replace all parts failing inspection.
END OF TASK
INSTALLATION
1.
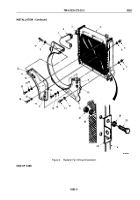
Install bottom half of shroud (Figure 2, Item 8) on radiator (Figure 2, Item 17) with clip (Figure 2, Item 9), five
screws (Figure 2, Item 10), seven washers (Figure 2, Item 11), and two locknuts (Figure 2, Item 15). Ensure
clip is mounted under correct screw.
2.
Align fan blade (Figure 2, Item 32) with fan clutch holes (Figure 2, Item 34) and install six washers
(Figure
2,
Item 31) and nuts (Figure 2, Item 30). Tighten nuts 36 lb-ft (47 N·m).
3.
Remove two screws (Figure 2, Item 27) from fan clutch (Figure 2, Item 29).
4.
Coat screw (Figure 2, Item 27) threads with antiseize compound and install screws on fan mounting bracket
(Figure 2, Item 26).
5.
Install top half of shroud (Figure 2, Item 2) on radiator (Figure 2, Item 17) with five screws (Figure 2, Item 4),
six washers (Figure 2, Item 3), and two locknuts (Figure 2, Item 16). Finger-tighten screws.
6.
Secure halves of shroud (Figure 2, Items 2 and 8) with eight washers (Figure 2, Item 6), four screws
(Figure
2, Item 7), and locknuts (Figure 2, Item 5).
7.
Tighten five screws (Figure 2, Item 4) and two locknuts (Figure 2, Item 16).
8.
Install two sets of resident mounts (Figure 2, Item 12) in brackets (Figure 2, Items 18 and 23).
9.
Install spacer (Figure 2, Item 19) and bracket (Figure 2, Item 23) on bracket (Figure 2, Item 18) and radiator
(Figure 2, Item 17) with two screws (Figure 2, Item 13), washers (Figure 2, Item 14), snubbing washers
(Figure
2, Item 25), and locknuts (Figure 2, Item 24). Finger tighten locknuts.
10.
Install two lockwashers (Figure 2, Item 20) and screws (Figure 2, Item 21) on bracket (Figure 2, Item 23) and
radiator (Figure 2, Item 17). Tighten screws 40 lb-ft (55 N·m). Bend tabs on lockwashers against flats of screws.
11.
Tighten locknuts (Figure 2, Item 24) 35 lb-ft (50 N·m).
TM 9-2320-272-23-2
0283
0283-4
Back to Top


