TM-9-2320-272-23-2 - Page 991 of 1417
INSTALLATION
1.
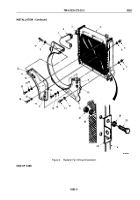
Install four brackets (Figure 2, Item 26) on radiator (Figure 2, Item 4) with 16 washers (Figure 2, Item 24), eight
screws (Figure 2, Item 25), and locknuts (Figure 2, Item 27). Tighten screws 10 to 14 lb-ft (14 to 19 N·m).
2.
Install fan shroud (Figure 2, Item 11) on radiator (Figure 2, Item 4) with five washers (Figure 2, Item 14),
lockwashers (Figure 2, Item 15), and screws (Figure 2, Item 16). Tighten screws to 10 to 14 lb-ft
(14 to 19 N·m).
3.
Install fan shroud (Figure 2, Item 11) on radiator (Figure 2, Item 4) with three washers (Figure 2, Item 12),
screws (Figure 2, Item 13), washers (Figure 2, Item 8), and locknuts (Figure 2, Item 7).
4.
Install corner shroud (Figure 2, Item 23) on radiator (Figure 2, Item 4) with four washers (Figure 2, Item 9),
screws (Figure 2, Item 17), washers (Figure 2, Item 9), and locknuts (Figure 2, Item 10). Tighten screws
66 to 86 lb-in. (7 to 10 N·m).
5.
Install corner shroud (Figure 2, Item 23) on radiator (Figure 2, Item 4) with washer (Figure 2, Item 19), screw
(Figure 2, Item 18), washer (Figure 2, Item 6), and locknut (Figure 2, Item 5). Tighten screw 10 to 14 lb-ft
(14
to
19
N·m).
6.
Secure corner shroud (Figure 2, Item 23) on radiator (Figure 2, Item 4) with washer (Figure 2, Item 22),
lockwasher (Figure 2, Item 21), and screw (Figure 2, Item 20). Tighten screw 10 to 14 lb-ft (14 to 19 N·m).
7.
Connect radiator hose (Figure 2, Item 1) to radiator inlet (Figure 2, Item 3) and tighten clamp
(Figure
2,
Item
2).
TM 9-2320-272-23-2
0282
0282-4
Back to Top


