TM-9-2320-272-23-2 - Page 995 of 1417
REMOVAL
1.
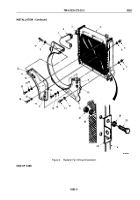
Remove two locknuts (Figure 1, Item 24), snubbing washers (Figure 1, Item 25), screws (Figure 1, Item 13),
and washers (Figure 1, Item 14) from brackets (Figure 1, Items 18 and 23). Discard locknuts.
2.
Remove two sets of resident mounts (Figure 1, Item 12) from brackets (Figure 1, Items 18 and 23). Discard
resident mounts.
3.
Straighten tabs on two lockwashers (Figure 1, Item 20) and remove screws (Figure 1, Item 21), lockwashers,
bracket (Figure 1, Item 23), and spacer (Figure 1, Item 19) from radiator (Figure
1,
Item
17). Let bracket hang
from attaching cables (Figure 1, Item 22) on vehicle hood (Figure 1, Item 1). Discard lockwashers.
4.
Remove four locknuts (Figure 1, Item 5), eight washers (Figure 1, Item 6), and four screws (Figure 1, Item 7)
securing top half of shroud (Figure 1, Item 2) to bottom half of shroud (Figure 1, Item 8). Discard locknuts.
5.
Remove five screws (Figure 1, Item 4), six washers (Figure 1, Item 3), two locknuts (Figure 1, Item 16), and
top half of shroud (Figure 1, Item 2) from radiator (Figure 1, Item 17). Discard locknuts.
6.
Remove two screws (Figure 1, Item 27) from fan mounting bracket (Figure 1, Item 26), position fan drive pulley
(Figure 1, Item 28) with fan clutch (Figure 1, Item 29) so fan clutch holes (Figure 1, Item 34) are aligned, and
install two screws in fan clutch holes (Figure 1, Item 34).
7.
Remove six nuts (Figure 1, Item 30), washers (Figure 1, Item 31), and fan blade (Figure 1, Item 32) from fan
clutch (Figure 1, Item 29).
8.
Remove five screws (Figure 1, Item 10), seven washers (Figure 1, Item 11), two locknuts (Figure 1, Item 15),
clip (Figure 1, Item 9), and bottom half of shroud (Figure 1, Item 8) from radiator (Figure 1, Item 17).
Discard
locknuts.
TM 9-2320-272-23-2
0283
0283-2
Back to Top


