TM-9-2320-272-23-2 - Page 985 of 1417
INSTALLATION - Continued
NOTE
Perform Step (6) only if bracket was removed.
6.
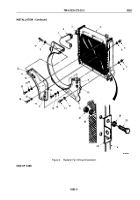
Install radiator support bracket (Figure 5, Item 10) with two washers (Figure 5, Item 9), lockwashers
(Figure
5,
Item
8), and screws (Figure 5, Item 13).
NOTE
Assistant is needed for Steps (7), (8), and (9).
7.
Install radiator (Figure 5, Item 3) on frame.
8.
Install radiator support (Figure 5, Item 14) on support bracket (Figure 5, Item 10) with two screws
(Figure
5,
Item
7), screws (Figure 5, Item 19), and four locknuts (Figure 5, Item 12).
9.
Install washer (Figure 5, Item 17), screw (Figure 5, Item 18), and locknut (Figure 5, Item 11) on brackets
(Figure
5,
Items
10
and
15).
10.
Connect radiator outlet hose (Figure 5, Item 5) to radiator (Figure 5, Item 3) and tighten clamp
(Figure
5,
Item
4).
11.
Install two plugs (Figure 5, Item 16) and drain valve (Figure 5, Item 6) on radiator (Figure 5, Item 3).
12.
Install two elbows (Figure 5, Item 20) and adapter (Figure 5, Item 1) on radiator (Figure 5, Item 3).
13.
Install two plugs (Figure 5, Item 16) to radiator (Figure 5, Item 3).
20
M9719DAA
1
2
3
4
6
7
8
5
9
10
11
12
13
14
15
16
17
18
19
Figure 5.
Radiator (M939/A1) Installation.
TM 9-2320-272-23-2
0281
0281-6
Back to Top


