TM-9-2320-272-23-2 - Page 983 of 1417
REMOVAL - Continued
17.
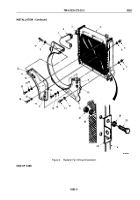
Remove locknut (Figure 3, Item 7), screw (Figure 3, Item 12), and radiator support (Figure 3, Item 6) from
radiator (Figure 3, Item 15). Discard locknut.
18.
Remove two locknuts (Figure 3, Item 2), screws (Figure 3, Item 14), and control assembly (Figure 3, Item 13)
from mounting bracket (Figure 3, Item 1). Discard locknuts.
19.
Remove four screws (Figure 3, Item 5), lockwashers (Figure 3, Item 4), washers (Figure 3, Item 3), and
mounting bracket (Figure 3, Item 1) from radiator (Figure 3, Item 15). Discard lockwashers.
20.
Remove two screws (Figure 3, Item 9), lockwashers (Figure 3, Item 10), and bracket (Figure 3, Item 11) from
radiator (Figure 3, Item 15). Discard lockwashers.
21.
Remove rubber mount (Figure 3, Item 8) from bracket (Figure 3, Item 11).
M0133DAA
2
3
4
5
6
7
8
9
10
11
15
1
14
12
13
Figure 3.
Radiator (M939/A1) Removal.
END OF TASK
TM 9-2320-272-23-2
0281
0281-4
Back to Top


