TM-9-2320-272-23-2 - Page 984 of 1417
INSTALLATION
NOTE
•
If radiator is being installed, use attaching parts and fittings from old radiator.
•
Fittings must be inspected for cracks or stripped threads.
•
Male pipe threads must be wrapped with antiseize tape before installation.
1.
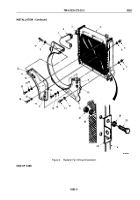
Install rubber mount (Figure 4, Item 8) in angle bracket (Figure 4, Item 11).
2.
Install bracket (Figure 4, Item 11) on radiator (Figure 4, Item 14) with two lockwashers (Figure 4, Item 10) and
screws (Figure 4, Item 9).
3.
Install mounting bracket (Figure 4, Item 1) on radiator (Figure 4, Item 15) with four washers (Figure 4, Item 4),
lockwashers (Figure 4, Item 3), and screws (Figure 4, Item 5).
4.
Install control assembly (Figure 4, Item 13) on bracket (Figure 4, Item 1) with two screws (Figure 4, Item 14)
and locknuts (Figure 4, Item 2).
5.
Install radiator support (Figure 4, Item 6) on control assembly (Figure 4, Item 13) with screw
(Figure
4,
Item
12) and locknut (Figure 4, Item 7).
2
M9721DAA
3
4
5
6
7
8
9
10
11
15
1
14
12
13
Figure 4.
Radiator (M939/A1) Installation.
TM 9-2320-272-23-2
0281
0281-5
Back to Top


