TM-9-2320-272-23-3 - Page 691 of 1469
ASSEMBLY
CAUTION
Keep all anchor parts together. Intermixing right and left plunger parts will cause brake
system
damage.
NOTE
Apply a light film of grease, included with new parts kit, to all metal parts, lips of seals, and
plunger housing bores.
1.
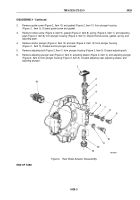
Place a piece of tape over slots of two anchor plungers (Figure 3, Item 2) to protect lips of seals
(Figure
3,
Item
1).
2.
Install two seals (Figure 3, Item 1) in double grooves of anchor plungers (Figure 3, Item 2).
NOTE
Ensure correct anchor plunger, L or R, is installed in bore of anchor housing.
3.
Align guide grooves (Figure 3, Item 19) of anchor plungers (Figure 3, Item 2) with guide screw holes
(Figure
3,
Item
17) of anchor plunger housing (Figure 3, Item 16).
4.
Install anchor plungers (Figure 3, Item 2) in anchor plunger housing (Figure 3, Item 16). Using hammer and
1-3/4 in. (44.45-mm) wrench socket, seat seals (Figure 3, Item 1) in anchor plunger housing.
5.
Remove tape from anchor plungers (Figure 3, Item 2).
6.
Install two gaskets (Figure 3, Item 15) and guide screws (Figure 3, Item 14) in anchor plunger housing
(Figure
3,
Item
16) and anchor plunger (Figure 3, Item 2). Tighten guide screws 15
to
20
lb-ft
(20
to
27
N·m).
TM 9-2320-272-23-3
0427
0427-6
Back to Top

