TM-9-2320-272-23-4 - Page 1183 of 1393
INSTALLATION
1.
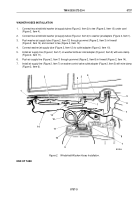
Install muffler (Figure 2, Item 12) on wiper motor (Figure 2, Item 10).
NOTE
Wrap male pipe threads with antiseize tape before installation.
2.
Install adapter fittings (Figure 2, Item 9) and (Figure 2, Item 11) in wiper motor (Figure 2, Item 10).
3.
Install bracket (Figure 2, Item 7) on wiper motor (Figure 2, Item 10) with two spacers (Figure 2, Item 13) and
screws (Figure 2, Item 14).
4.
Install wiper motor (Figure 2, Item 10) and bracket (Figure 2, Item 7) on windshield frame (Figure 2, Item 5)
with two screws (Figure 2, Item 6) and locknuts (Figure 2, Item 8).
5.
Install hoses (Figure 2, Items 2 and 3) on adapter fittings (Figure 2, Item 11) and (Figure 2, Item 9) with hose
clamps (Figure 2, Items 1 and 4).
6.
Install leather washer (Figure 2, Item 16), washer (Figure 2, Item 17), and nut (Figure 2, Item 18) on wiper
motor shaft (Figure 2, Item 10).
7.
Install knurled drive (Figure 2, Item 19) on wiper motor shaft (Figure 2, Item 15).
8.
Install wiper arm (Figure 2, Item 20) on wiper motor shaft (Figure 2, Item 15) with lockwasher
(Figure 2, Item 21) and nut (Figure 2, Item 22). Tighten nut 15 to 20 lb-ft (20 to 27 N·m).
9.
Install wiper blade (Figure 2, Item 25) on wiper arm (Figure 2, Item 20) with screw (Figure 2, Item 24) and
locknut (Figure 2, Item 23). Tighten locknut 15 to 20 lb-ft (20 to 27 N·m).
M5127DAA
23
24
25
10
15
5
16
17
18
19
20
21
22
7
8
9
10
11
12
13
14
1
2
3
4
5
6
Figure 2.
Windshield Wiper Blade, Wiper Arm, and Wiper Motor Removal.
END OF TASK
TM 9-2320-272-23-4
0736
0736-4
Back to Top


