TM-9-2320-272-23-4 - Page 597 of 1393
REMOVAL
NOTE
•
The left and right main wiring harnesses are replaced the same way. This procedure
covers the right main wiring harness.
•
Tag wires for installation.
1.
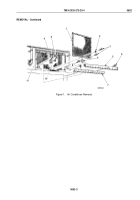
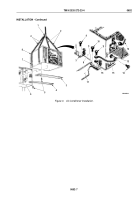
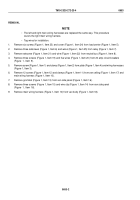
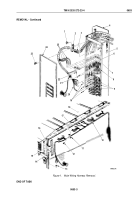
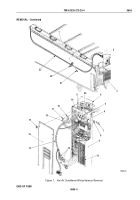
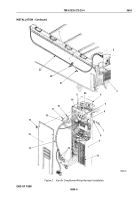
Remove six screws (Figure 1, Item 23) and cover (Figure 1, Item 24) from load center (Figure 1, Item 5).
2.
Remove three setscrews (Figure 1, Item 6) and wires (Figure 1, Item 25) from relay (Figure 1, Item 7).
3.
Remove setscrew (Figure 1, Item 21) and wire (Figure 1, Item 22) from neutral bus (Figure 1, Item 8).
4.
Remove three screws (Figure 1, Item 19) and five wires (Figure 1, Item 20) from 20 amp circuit breakers
(Figure
1,
Item
9).
5.
Remove screw (Figure 1, Item 1) and clamp (Figure 1, Item 2) from plate (Figure 1, Item 4) and wiring harnesses
(Figure 1, Item 3).
6.
Remove 12 screws (Figure 1, Item 12) and clamps (Figure 1, Item 11) from van ceiling (Figure 1, Item 17) and
main wiring harness (Figure 1, Item 10).
7.
Remove grommet (Figure 1, Item 13) from van side panel (Figure 1, Item 16).
8.
Remove three screws (Figure 1, Item 15) and wire clip (Figure 1, Item 14) from van side panel
(Figure
1,
Item
16).
9.
Remove main wiring harness (Figure 1, Item 10) from van body (Figure 1, Item 18).
TM 9-2320-272-23-4
0653
0653-2
Back to Top

