TM-9-2320-272-23-4 - Page 959 of 1393
INSTALLATION
NOTE
•
When hydraulic oil reservoir is installed, use attaching parts and fittings from old hydraulic
oil reservoir.
•
Wrap all male threads with antiseize tape before installation.
1.
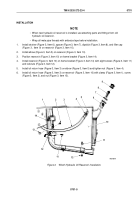
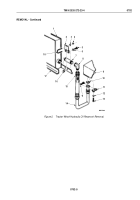
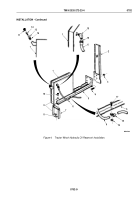
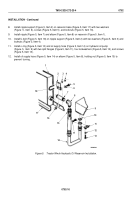
Install strainer (Figure 4, Item 14), spacer (Figure 4, Item 13), dipstick (Figure 4, Item 12), and filler cap
(Figure
4,
Item
11) on reservoir (Figure 4, Item 1).
2.
Install elbow (Figure 4, Item 15) on reservoir (Figure 4, Item 1).
3.
Position reservoir (Figure 4, Item 1) on reservoir base (Figure 4, Item 5) and frame bracket (Figure 4, Item 7).
4.
Install reservoir (Figure 4, Item 1) on frame bracket (Figure 4, Item 7) with two washers (Figure 4, Item 9),
screws (Figure 4, Item 10), washers (Figure 4, Item 9), and locknuts (Figure 4, Item 8).
5.
Install muffler support (Figure 4, Item 2) on reservoir base (Figure 4, Item 5) with four screws
(Figure
4,
Item
4) and locknuts (Figure 4, Item 3).
6.
Install oil return hose (Figure 4, Item 6) on elbow (Figure 4, Item 15), holding nut (Figure 4, Item 16) to
prevent
turning.
7.
Install oil return hose (Figure 4, Item 6) on reservoir base (Figure 4, Item 5) with clamp (Figure 4, Item 18),
screw (Figure 4, Item 17), and locknut (Figure 4, Item 19).
TM 9-2320-272-23-4
0702
0702-8
Back to Top

