TM-9-2320-272-24-2 - Page 662 of 991
TM 9-2320-272-24-2
3-464. AIR DRYER AND CHECK VALVE MAINTENANCE
THIS TASK COVERS:
a. Removal
b. Disassembly
c. Cleaning and Inspection
d. Assembly
e. Installation
INITIAL
SETUP:
APPLICABLE
MODELS
REFERENCES (TM)
M939A2
TM 9-2320-272-10
TM 9-2320-272-24P
TOOLS
General mechanic’s tool kit (Appendix E, Item 1)
MATERIALS/PARTS
EQUIPMENT CONDITION
l
Parking brake set (TM 9-2320-272-10).
l
Air reservoirs drained (TM 9-2320-272-10).
Filter element kit (Appendix D, Item 124)
Four locknuts (Appendix D, Item 294)
Terminal (Appendix D, Item 681)
Connector (Appendix D, Item 41)
Two lockwashers (Appendix D, Item 400)
Tiedown straps (Appendix D, Item 696)
Cap and plug set (Appendix C, Item 14)
Antiseize tape (Appendix C, Item 72)
Lint-free cloth (Appendix C, Item 21)
GENERAL SAFETY INSTRUCTIONS
l
When cleaning with compressed air, wear
eyeshields and ensure source pressure.
l
Eyeshields must be worn when releasing
compressed air.
a. Removal
WARNING
Air system components are subject to high pressure. Always
relieve pressure before loosening or removing air system
components. Failure to do so may result in injury to personnel.
NOTE
l
Note location and position of tiedown straps for installation.
l
When removing air lines, plug ends and tag for installation.
1.
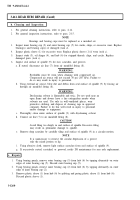
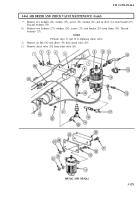
Remove all tiedown straps (13) from air lines (12), (16), and (18). Discard tiedown straps (13).
2.
Disconnect lead (26) from connector (25).
3.
Remove nut (22) and ground wire (21) from screw (23).
4.
Remove air line (18) and elbow (17) from air dryer (14).
5.
Remove air line (12) and connector (11) from adapter (10).
6.
Remove air line (16) and elbow (8) from adapter (9).
7.
Remove two locknuts (1), washers (2), screws (15), washers (2), and dryer (14) from bracket (5). Discard
locknuts (1).
8.
Remove two locknuts (7), washers (6), screws (3), and bracket (5) from frame (4). Discard locknuts (7).
NOTE
Perform steps 9 and 10 for M931A2 and M932A2 model vehicles.
3-1270
Back to Top

