TM-9-2320-280-20-2 - Page 368 of 951
4-77. STARTER POWER CABLES REPLACEMENT (Cont'd)
b. Installation
1.
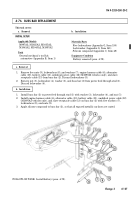
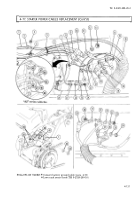
Install coil (16) on positive cable (11) and grommet cable (20). Route STE/ICE-R harness (14) and
compressor harness (1) (M997 and M997A1 vehicles only) through coil (16), and place cables (11)
and (20), STE/ICE-R harness (14), and compressor harness (1) (M997 and M997A1 vehicles only) in
approximate mounting locations.
2.
Install positive cable (11) and lead 6B/6C (37) on power stud (30) with washer (36), lockwasher (35),
and nut (34). Tighten nut (34) 26 lb-ft (35 N
•
m). Slide rubber boot (29) over power stud (30).
3.
Install ground cable (20) on ground stud (31) with lockwasher (32) and nut (33). Tighten nut (33)
75 lb-ft (102 N
•
m).
NOTE
Perform step 4 for all vehicles except “A2” series vehicles. Perform
steps 5 and 6 for M997A2, M1025A2, M1035A2, M1043A2,
M1045A2, and M1097A2 vehicles only.
4.
Install STE/ICE-R leads 81B (8) and 81A (9), positive accessory cable (10), and positive cable (11),
(vehicles with winch or 200 amp alternator only) on positive post (7) with lockwasher (12) and
nut (13). Tighten nut (13) 25-30 lb-ft (34-41 N
•
m).
5.
Install lead 81B (8) on positive post (7) with lockwasher (12) and nut (13). Tighten nut (13)
25-30 lb-ft (34-41 N
•
m).
6.
Install positive accessory cable (49) and positive cable (48) (vehicles with winch or 200 amp
alternator only) on buss bar (44) with two washers (47), lockwashers (46), and nuts (45). Tighten
nuts (45) 25-30 lb-ft (34-41 N
•
m).
7.
Apply sealant to positive post (7) and cable terminals so that all exposed metallic surfaces are
coated. The sealant should be evenly applied with a minimum thickness of .12 in. (3 mm).
8.
Install lead 7C (22) (winch vehicles only), STE/ICE-R 3C lead (21), and ground cable (20) on
negative post (23) with lockwasher (19) and nut (18). Tighten nut (18) 15-20 lb-ft (20-27 N
•
m).
9.
Install leads 74A (27) and 74B (26) on solenoid (28) with clip (25) and screw (24).
10.
Install two clamps (17) on positive cable (11) and ground cable (20) and secure to starter (6) with
screws (15).
NOTE
Perform steps 11 through 14 for M997, M997A1, and M997A2
vehicles only.
11.
Connect compressor harness leads (39) to compressor leads (38).
12.
Install clamp (41) on compressor harness (1) and capscrew (40) with lockwasher (42) and nut (43).
13.
Install clamp (2) on compressor harness (1) and cable bracket screw (4) with assembled locknut (3).
14.
Install compressor harness (1) on alternator cable (10) and lead 81A (9) with tiedown strap (5).
TM 9-2320-280-20-2
4-130
Change 3
Back to Top


