TM-9-2320-280-20-3 - Page 294 of 1168
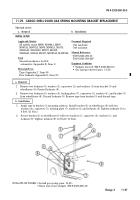
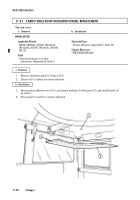
11-27. CARGO SHELL DOOR REAR STRIKER MOUNTING PLATE REPLACEMENT
This task covers:
a. Removal
b. Installation
a. Removal
1.
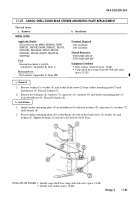
Remove locknut (5), washer (4), and socket head screw (2) from striker mounting plate (3) and
wheelhouse (8). Discard locknut (5).
2.
Remove five locknuts (6), washers (7), capscrews (1), washers (9), and striker mounting plate (3)
from wheelhouse (8). Discard locknuts (6).
INITIAL SETUP:
Applicable Models
All models except M996, M996A1, M997,
M997A1, M997A2 M998, M998A1, M1035,
M1035A1, M1035A2, M1037, M1038,
M1038A1, M1042, M1097, M1097A1,
M1097A2
Tools
General mechanic’s tool kit:
automotive (Appendix B, Item 1)
Materials/Parts
Six locknuts (Appendix G, Item 128)
Personnel Required
One mechanic
One assistant
Manual References
TM 9-2320-280-10
TM 9-2320-280-24P
Equipment Condition
• Rear striker removed (para. 11-26).
• Cargo shell door strap removed (left side only)
(para. 11-22).
b. Installation
1.
Install striker mounting plate (3) on wheelhouse (8) with five washers (9), capscrews (1), washers (7),
and locknuts (6).
2.
Secure striker mounting plate (3) to wheelhouse (8) with socket head screw (2), washer (4), and
locknut (5). Tighten locknuts (5) and (6) to 25-30 lb-ft (34-41 N
•
m).
FOLLOW-ON TASKS: • Install cargo shell door strap (left side only) (para. 11-22).
• Install rear striker (para. 11-26).
TM 9-2320-280-20-3
Change 2
11-45
Back to Top

