TM-9-2320-361-34 - Page 215 of 764
TM 9-2320-361-34
I
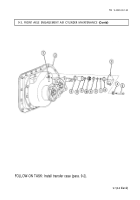
9-3. FRONT AXLE ENGAGEMENT AIR CYLINDER MAINTENANCE
THIS TASK COVERS:
a. Removal
c. Installation
b. Cleaning and Inspection
INITIAL SETUP
APPLICABLE MODELS
REFERENCES (TM)
All
TM 9-2320-361-34P
TOOLS
EQUIPMENT CONDITION
General mechanic’s tool kit
(Appendix B, Item 1)
Transfer case removed (para. 9-2).
MATERIALS/PARTS
Air cylinder parts kit (Appendix F, Item 186)
GM grease (Appendix C, Item 8)
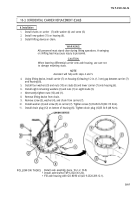
1. Bend four locktabs (4) down and remove four screws (5), locktabs (4), air cylinder cover (3), and
brass ring (6) from transfer case (2). Discard locktabs (4) and brass ring (6).
2. Remove air cylinder (11) from transfer case (2).
3.
Remove nut (7), washer (8), piston (10), washer (8), and brass ring (6) from shifter shaft (1). Discard
washers (8) and brass ring (6).
4.
Remove seal (9) from piston (10). Discard seal (9).
b. Cleaning and Inspection
Clean and inspect air cylinder cover (3), air cylinder (11), and piston (10) (paras. 2-8 and 2-9).
I
c.
Installation
I
1. Apply a small amount of GAA grease on new seal (9) and install on piston (10).
2. Install piston (10) on shifter shaft (1) with two new washers (8) and nut (7). Tighten nut (7)
48-61 lb-ft (65-83 N.m).
NOTE
Ensure air cylinder cover is installed with air line opening
positioned toward bottom of transfer case.
3. Install new brass ring (6), air cylinder (11), new brass ring (6), air cylinder cover (3), four new
locktabs (4), and screws (5) on transfer case (2). Tighten screws (5) 5-8 lb-ft (7-11 N.m).
4. Bend locktabs (4) down on transfer case (2) and bend locktabs (4) upon air cylinder screws (5).
9-6
Back to Top

