TM-9-2320-361-34 - Page 235 of 764
TM 9-2320-361-34
10-4.
DIFFERENTIAL CARRIER REPAIR
(Contd)
NOTE
Lubricate all parts before assembly.
c.
Assembly
and Adjustment
1.
2.
3.
4.
5.
6.
7.
8.
9.
10.
11.
12.
13.
14.
15.
10-18
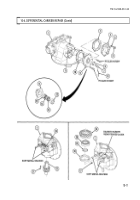
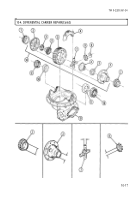
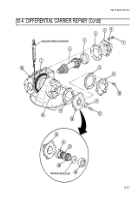
Press pinion (9) on long end of shaft (10).
Press bearing (8) on hub of pinion (9).
Press bearing (11) on shaft (10).
Install shaft (10) in carrier (12) through opening in rear of carrier (12).
CAUTION
Use brass drift to insert bearing seats in carrier. Failure to do so
may result in damage to bearing seats.
Install bearing seats (7) and (13) on carrier (12) over bearings (8) and (11).
Using oil seal replacer and handle, install new oil seal (6) in front retainer (3) and new oil seal (6) in
rear retainer (5).
NOTE
Begin installation of shims with same thickness of shims on front
and rear retainer as removed during disassembly.
Aline holes in shims (4) with holes in retainers (3) and (5) and install shims (4), front retainer (3),
shims (4), and rear retainer (5) on carrier (12) with twelve washers (2) and screws (1). Tighten
screws (1) 65-85 lb-ft (88-115 N.m).
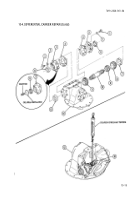
Wrap cable of bearing
preload
tester
around
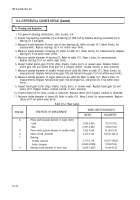
shaft (10) and pull on tester until shaft (10) turns.
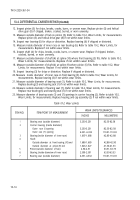
Proper bearing preload measurement is 7.44-34.04 lb (3.37-15.44 kg).
If bearing preload is correct, go to step 14.
Remove six screws (1), washers (2), and either retainer (3) or (5) from carrier (12).
NOTE
●
If measurement is more than limit, add a shim or use a thicker
shim.
●
If measurement is less than limit, remove a shim or use a thinner
shim.
Add or remove shims (4) as necessary.
Install retainer (3) or (5) on carrier (12) with six screws (1) and washers (2). Tighten screws (1) 65-85
lb-ft
(88-115 N.m).
Repeat step 8.
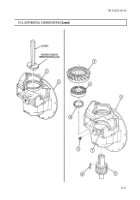
Remove six screws (1), washers (2), rear retainer (5), and shims (4) from carrier (12). Tie shims (4) to
retainer (6).
CAUTION
Use brass drift to remove shaft from carrier. Failure to do so may
result in damage to shaft.
NOTE
Do not remove bearings or pinion from shaft.
Remove bearing seat (7) and shaft (10) through hole in rear of carrier (12).
Back to Top


